Difference between revisions of "Terracoin Core Wallet"
| (24 intermediate revisions by the same user not shown) | |||
| Line 3: | Line 3: | ||
Whenever you are storing objects with a market value, security is necessary. This applies to barter systems as well as economies using currency as a medium of exchange. While banks store balances on a private ledger, cryptocurrencies store balances under unique addresses on a distributed public ledger. The cryptographic private keys to access the balance stored on each public address are therefore the object of value in this system. This section of the documentation discusses different practical methods of keeping these keys safe in wallets, while still remaining useful for day-to-day needs. |
Whenever you are storing objects with a market value, security is necessary. This applies to barter systems as well as economies using currency as a medium of exchange. While banks store balances on a private ledger, cryptocurrencies store balances under unique addresses on a distributed public ledger. The cryptographic private keys to access the balance stored on each public address are therefore the object of value in this system. This section of the documentation discusses different practical methods of keeping these keys safe in wallets, while still remaining useful for day-to-day needs. |
||
| − | The Terracoin Core Wallet is the full official release supporting all Terracoin features as they are released, including InstantSend and PrivateSend, as well as the governance, masternode and voting features. It is identical to the software used by the Terracoin masternodes, and as such, it requires you to download the entire Terracoin blockchain. It is available for macOS, Linux, and Windows. |
+ | The Terracoin Core Wallet is the full official release supporting all Terracoin features as they are released, including InstantSend and [[PrivateSend]], as well as the governance, masternode and voting features. It is identical to the software used by the Terracoin masternodes, and as such, it requires you to download the entire Terracoin blockchain. It is available for macOS, Linux, and Windows. |
===Wallet Releases=== |
===Wallet Releases=== |
||
| Line 9: | Line 9: | ||
The newest wallet releases can always be found here: https://github.com/terracoin/terracoin/releases |
The newest wallet releases can always be found here: https://github.com/terracoin/terracoin/releases |
||
| − | == |
+ | ==Introduction to Terracoin Core== |
| − | |||
| − | WIP |
||
This documentation describes the Terracoin Core Wallet and how to use its basic functions. Since the functionality is similar across all supported platforms (Windows, macOS, Linux), the instructions and screenshots will reference the Windows software, highlighting differences between the platforms where necessary. See here for separate installation guides specific to each platform. |
This documentation describes the Terracoin Core Wallet and how to use its basic functions. Since the functionality is similar across all supported platforms (Windows, macOS, Linux), the instructions and screenshots will reference the Windows software, highlighting differences between the platforms where necessary. See here for separate installation guides specific to each platform. |
||
| Line 30: | Line 28: | ||
===Installation=== |
===Installation=== |
||
| − | Terracoin Core can be compiled from source or downloaded for Linux, macOS and Windows here. Full installation guides are available here. <!--Don't forget to |
+ | Terracoin Core can be compiled from source or downloaded for Linux, macOS and Windows here. Full installation guides are available here. <!--Don't forget to link--> |
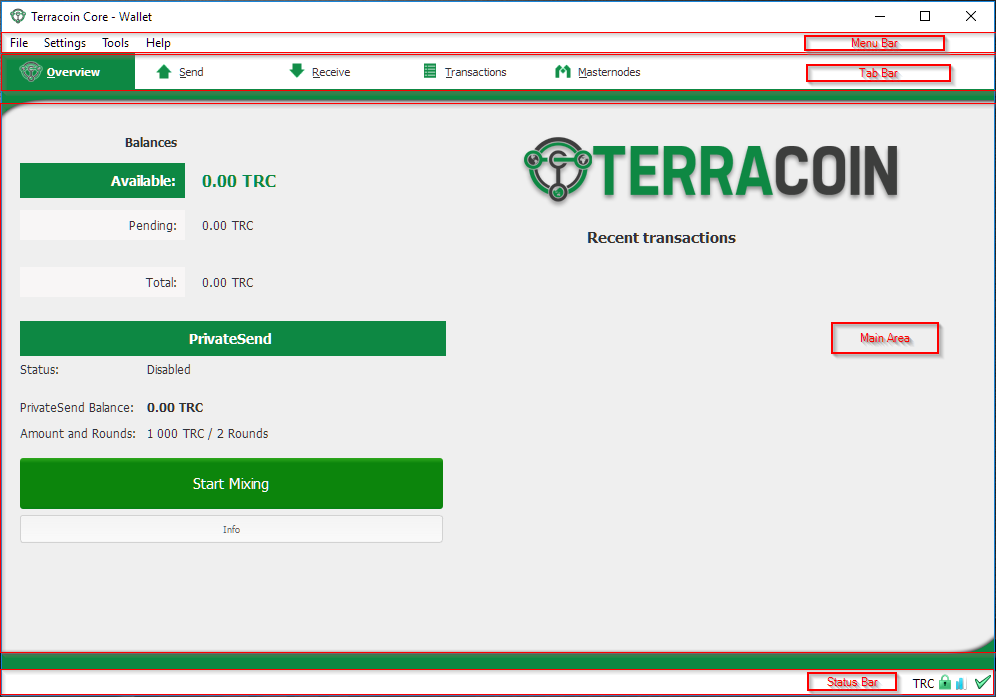
===The Main Window=== |
===The Main Window=== |
||
| Line 42: | Line 40: | ||
:* The main area |
:* The main area |
||
:* The status bar |
:* The status bar |
||
| − | |||
[[File:Main Window.png]] |
[[File:Main Window.png]] |
||
| Line 65: | Line 62: | ||
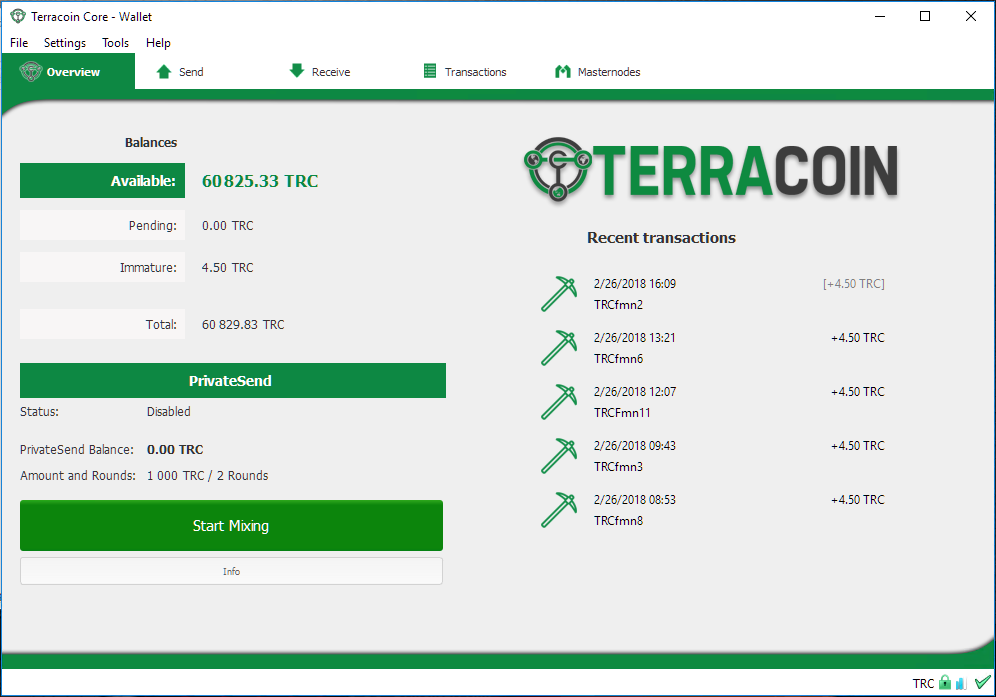
The overview tab offers quick access to your balance and most recent transactions, as well as the PrivateSend feature and options for coin mixing. |
The overview tab offers quick access to your balance and most recent transactions, as well as the PrivateSend feature and options for coin mixing. |
||
| − | + | [[File:Overview Tab.png]] |
|
| + | |||
| + | ''Terracoin Core Overview Tab'' |
||
The left part of the main area is divided into two areas. The upper area shows your balances: |
The left part of the main area is divided into two areas. The upper area shows your balances: |
||
| Line 89: | Line 88: | ||
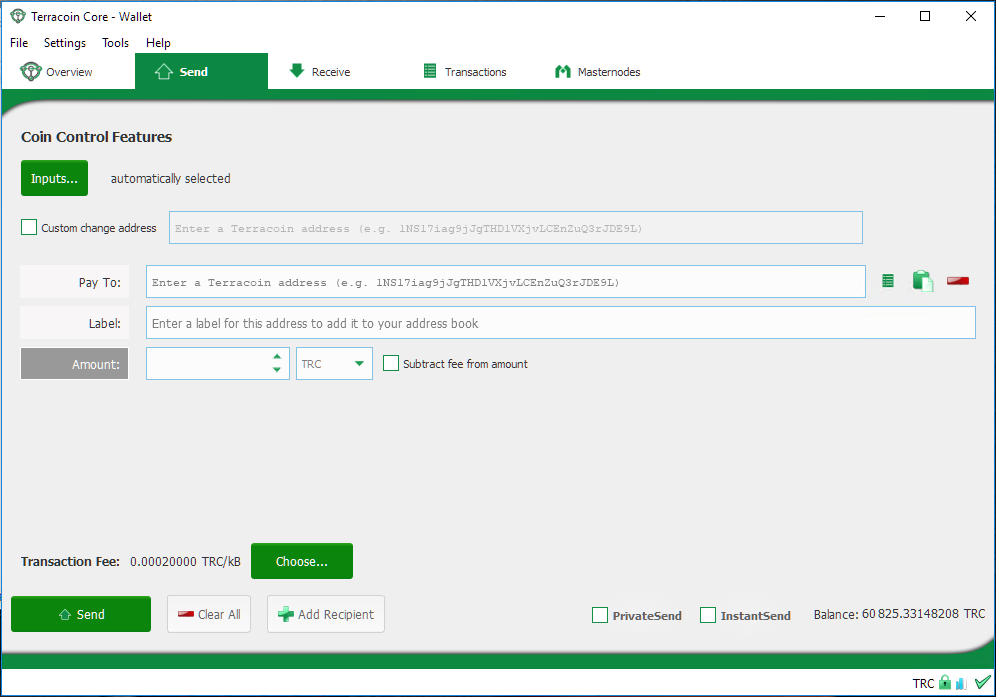
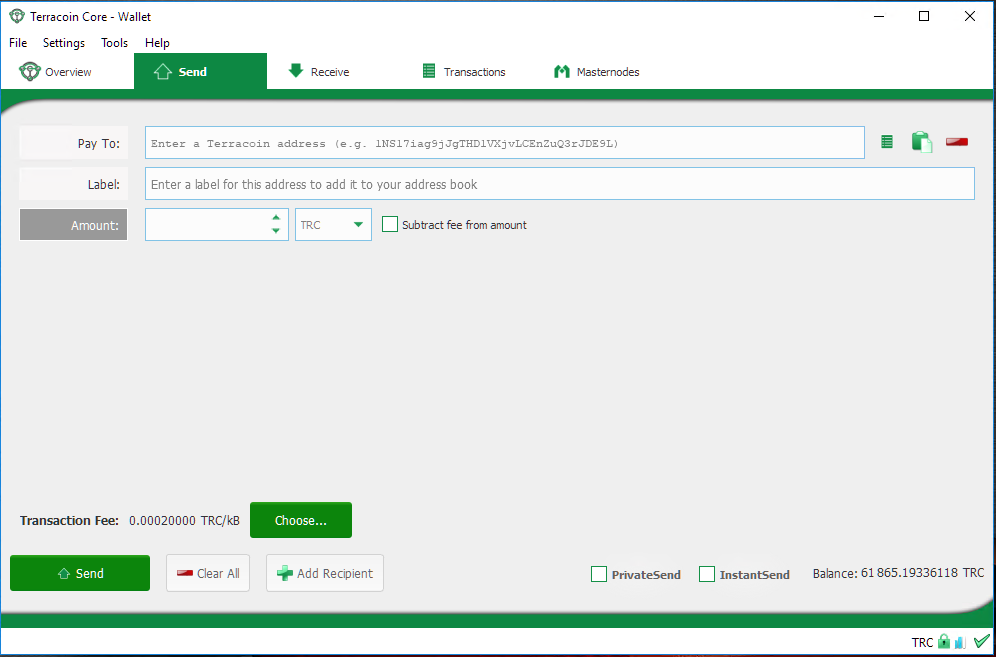
The Send tab allows you to send funds to another address on the Terracoin network. It contains fields to enter the recipient’s address, a label for the address, and the amount of Terracoin you wish to send. Options related to the transaction fee, InstantSend and PrivateSend are also available. A quick view of your total balance is also available in the lower right corner. |
The Send tab allows you to send funds to another address on the Terracoin network. It contains fields to enter the recipient’s address, a label for the address, and the amount of Terracoin you wish to send. Options related to the transaction fee, InstantSend and PrivateSend are also available. A quick view of your total balance is also available in the lower right corner. |
||
| + | |||
| + | [[File:Send Tab.png]] |
||
''Terracoin Core Send Tab'' |
''Terracoin Core Send Tab'' |
||
| Line 95: | Line 96: | ||
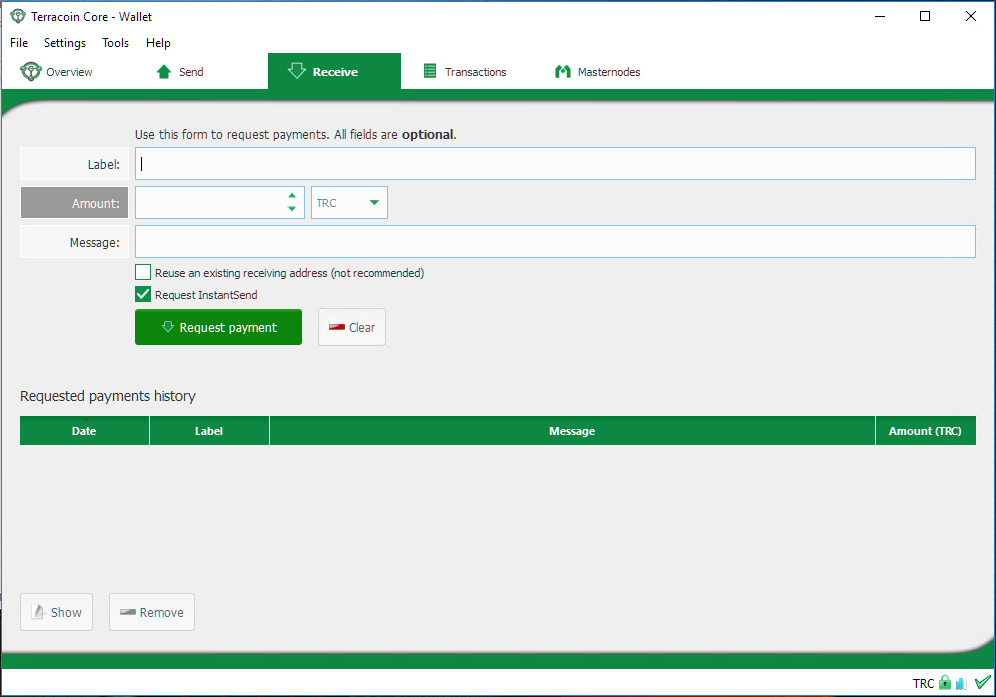
The Receive tab allows you to create addresses to receive Terracoin. You can create a request for a specific amount of Terracoin or include a specific message, and send it to another user as a link or QR code. |
The Receive tab allows you to create addresses to receive Terracoin. You can create a request for a specific amount of Terracoin or include a specific message, and send it to another user as a link or QR code. |
||
| + | |||
| + | [[File:Receive Tab.png]] |
||
''Terracoin Core Receive Tab'' |
''Terracoin Core Receive Tab'' |
||
| Line 103: | Line 106: | ||
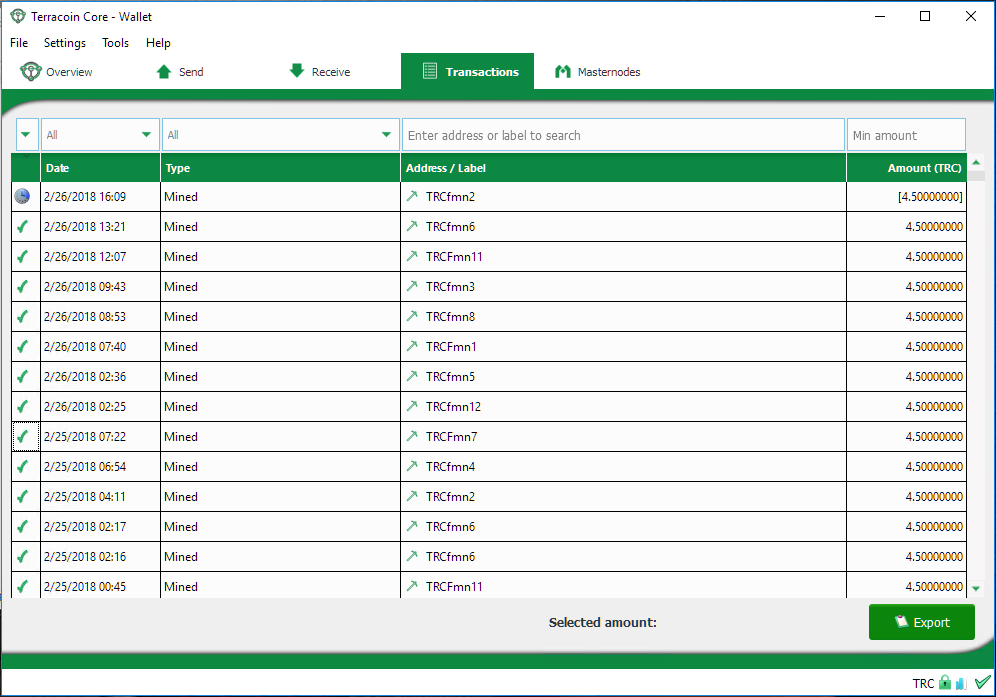
The icons in the leftmost column indicate the status of the transaction. A tick indicates that the recommended number of confirmations has been passed, while a clock indicates that the transaction has yet to reach six confirmations. |
The icons in the leftmost column indicate the status of the transaction. A tick indicates that the recommended number of confirmations has been passed, while a clock indicates that the transaction has yet to reach six confirmations. |
||
| + | |||
| + | [[File:Transaction Tab.png]] |
||
''Terracoin Core Transactions Tab'' |
''Terracoin Core Transactions Tab'' |
||
| Line 129: | Line 134: | ||
===Terracoin Core Options=== |
===Terracoin Core Options=== |
||
| + | |||
| + | This documentation describes the functionality of the Terracoin Core Options dialog, available under the Settings > Options menu in Terracoin Core. |
||
| + | |||
| + | ====Main==== |
||
| + | |||
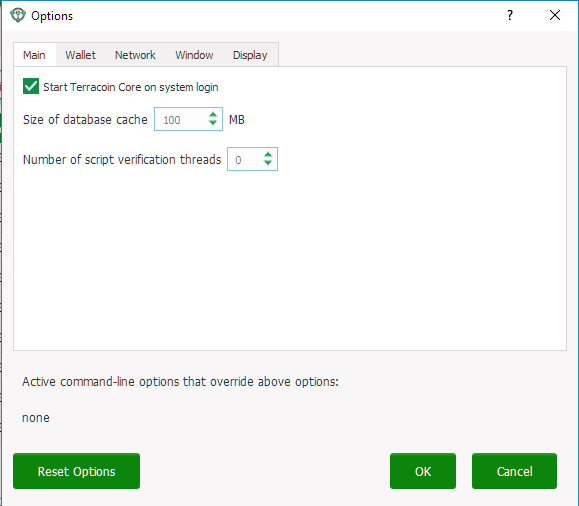
| + | The Main tab of the Options dialog contains settings related to startup and performance of the Terracoin Core app. |
||
| + | |||
| + | [[File:Options Main Tab.png]] |
||
| + | |||
| + | ''The Main tab of the Terracoin Core Options dialog'' |
||
| + | |||
| + | =====Start Terracoin Core on system login===== |
||
| + | |||
| + | This option causes Terracoin Core to start automatically when the current user logs in. On most computers there is only one main user account which is logged in automatically when the computer turns on, so this option is effectively the same as starting Terracoin Core together with the operating system. |
||
| + | |||
| + | =====Size of database cache===== |
||
| + | |||
| + | This option specifies the size of the database cache in memory. A higher value will result in increased performance when adding new blocks at the cost of higher memory usage. The default value is 100MB and it should not be set lower than this level. |
||
| + | |||
| + | =====Number of script verification threads===== |
||
| + | |||
| + | This option sets the number of script verification threads, ranging from -4 to 16. Script verification is the process of following instructions recorded in the blockchain to ensure the transactions are valid. 0 means automatic and will allow script verification to scale to the number of cores available on your processor. Setting a positive number specifies that Terracoin Core should use that number of processor cores, while setting a negative number will leave that number of processor cores free. |
||
| + | |||
| + | ====Wallet==== |
||
| + | |||
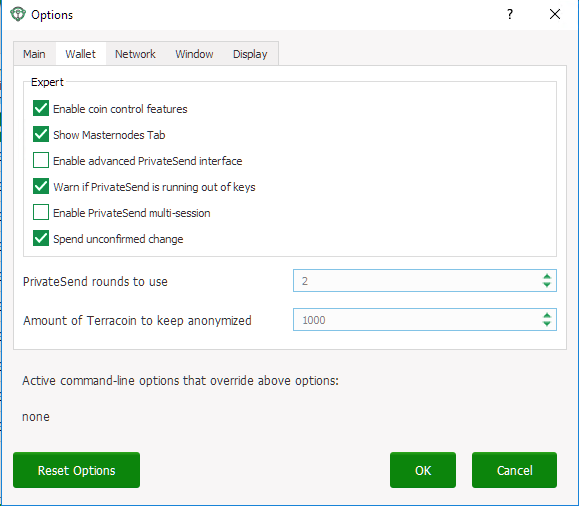
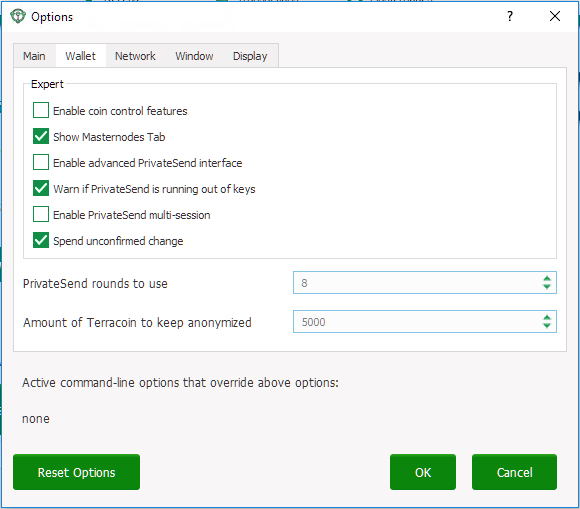
| + | The Wallet tab of the Options dialog contains settings related to how addresses are managed in the Terracoin Core app. The first time you run Terracoin Core, it will generate a new wallet containing 1000 unique Terracoin addresses. This tab allows you to configure how these addresses are used as inputs with the Coin Control, PrivateSend and Masternode features. |
||
| + | |||
| + | [[File:Options Wallet Tab.png]] |
||
| + | |||
| + | ''The Wallet tab of the Terracoin Core Options dialog'' |
||
| + | |||
| + | =====Enable coin control features===== |
||
| + | |||
| + | Your Terracoin Core wallet balance is actually the sum total of all addresses holding balance that are associated with your wallet. When you spend Terracoin, Terracoin Core will withdraw from as many inputs as necessary to make up the desired amount of Terracoin to be transferred. This behavior may be undesirable if you want to keep a certain balance on one address. The most common use case is the requirement to maintain 5000 Terracoin on a single address as collateral for a masternode. |
||
| + | |||
| + | Enabling this option will add a button labelled Inputs on the Send tab. This provides access to the Coin selection dialog, which can be used to lock, unlock and prioritize different addresses in your wallet. See here for a more detailed explanation of Coin Control. |
||
| + | |||
| + | =====Show Masternodes tab===== |
||
| + | |||
| + | Enabling this option causes Terracoin Core to display an additional Masternodes tab to the right of the Transactions tab. This option requires you to restart the Terracoin Core app. |
||
| + | |||
| + | The Masternodes tab can be used to manage interactions (start, stop, check status, etc.) with masternodes controlled by this wallet. This tab is an advanced feature not required by users that do not operate a masternode on the Terracoin network. See here for a description of the Masternodes tab. |
||
| + | |||
| + | =====Enable advanced PrivateSend interface===== |
||
| + | |||
| + | Enabling this option changes the PrivateSend mixing interface on the Overview tab of the Terracoin Core wallet to include more options, such as Try Mix and percentage completion. See here for a full explanation of how to use PrivateSend. |
||
| + | |||
| + | =====Warn if PrivateSend is running out of keys===== |
||
| + | |||
| + | Enabling this option will cause Terracoin Core to display a warning when your original set of 1000 addresses is running out, which may affect PrivateSend mixing. Every time a mixing event happens, up to 9 of your addresses are used up. This means those 1000 addresses last for about 100 mixing events. When 900 of them are used, your wallet must create more addresses. It can only do this, however, if you have automatic backups enabled. Consequently, users who have backups disabled will also have PrivateSend disabled. |
||
| + | |||
| + | =====Enable PrivateSend multi-session===== |
||
| + | |||
| + | Normally PrivateSend mixing is completed in several consecutive rounds, each using a single masternode. Enabling this option allows multi-session, which means you can use multiple masternode servers at the same time, greatly increasing the speed of the mixing process at the cost of creating more addresses and thus requiring more frequent wallet backups. This feature is experimental as of Terracoin Core 12.1.7. |
||
| + | |||
| + | =====Spend unconfirmed change===== |
||
| + | |||
| + | When this option is enabled, the Terracoin Core wallet permits you to immediately spend change from previous transactions that has been transferred internally between addresses associated with the same wallet. This is possible even if the transaction has not yet been confirmed because the wallet knows it will eventually be confirmed since it created the internal transaction itself. Leaving this option enabled allows you to create new transactions even if previous transactions have not yet been confirmed. |
||
| + | |||
| + | =====PrivateSend rounds to use===== |
||
| + | |||
| + | Use this option to control the number of rounds of PrivateSend mixing to be carried out for your chosen balance. Each round of mixing uses a new masternode. The higher the number of rounds, the more difficult it becomes to trace the Terracoin to its original address. This is at the expense of more time required for mixing and potentially higher fees. See here for a full explanation of how to use PrivateSend. |
||
| + | |||
| + | =====Amount of Terracoin to keep anonymized===== |
||
| + | |||
| + | This option allows you to specify how much Terracoin should be kept on balance in a ready-to-use anonymized state, meaning it has already passed through the PrivateSend mixing process. If you do not have sufficient Terracoin available in your balance of unlocked inputs, the amount will be automatically reduced to the available balance and shown in red in the PrivateSend interface on the Overview tab. |
||
| + | |||
| + | ====Network tab==== |
||
| + | |||
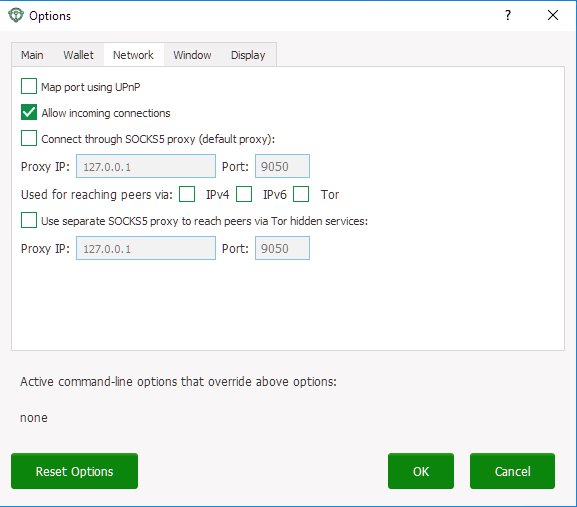
| + | This tab includes options related to how your connection to the Terracoin network is made. |
||
| + | |||
| + | [[File:Options Network Tab.png]] |
||
| + | |||
| + | ''The Network tab of the Terracoin Core Options dialog'' |
||
| + | |||
| + | =====Map port using UPnP===== |
||
| + | |||
| + | This option causes Terracoin Core to automatically attempt to open and map the client port on your router using UPnP (Universal Plug and Play). This feature is supported by most modern home routers and will allow you to connect to the Terracoin network without making any special settings on your router. |
||
| + | |||
| + | =====Allow incoming connections===== |
||
| + | |||
| + | This option causes your client to accept external connections. Since Terracoin is a peer-to-peer network and Terracoin Core is considered a full client because it stores a copy of the blockchain on your device, enabling this option helps other clients synchronize the blockchain and network through your node. |
||
| + | |||
| + | =====Connect through SOCKS5 proxy (default proxy)===== |
||
| + | |||
| + | These options allow users on an intranet requiring a proxy to reach the broader internet to specify the address of their proxy server to relay requests to the internet. Contact your system administrator or check out the network settings in your web browser if you are unable to connect and suspect a proxy may be the source of the problem. |
||
| + | |||
| + | =====Use separate SOCKS5 proxy to reach peers via Tor hidden services===== |
||
| + | |||
| + | These options allow you to specify an additional proxy server designed to help you connect to peers on the Tor network. This is an advanced option for increased privacy and requires a Tor proxy on your network. For more information about Tor, see here. |
||
| + | |||
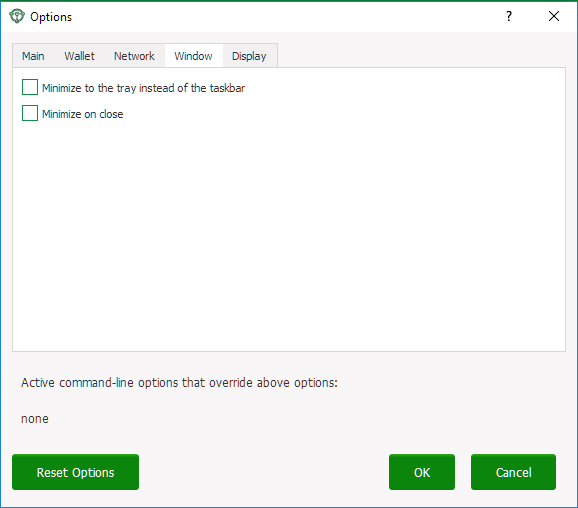
| + | ====Window tab==== |
||
| + | |||
| + | This option contains options governing behavior of the Terracoin Core app window under Microsoft Windows. |
||
| + | |||
| + | [[File:Options Window Tab.png]] |
||
| + | |||
| + | ''The Window tab of the Terracoin Core Options dialog'' |
||
| + | |||
| + | =====Hide tray icon===== |
||
| + | |||
| + | When this option is enabled, Terracoin Core will not display an icon in the system tray. This option cannot be selected at the same time as Minimize to the tray instead of the taskbar. |
||
| + | |||
| + | =====Minimize to the tray instead of the taskbar===== |
||
| + | |||
| + | When this option is enabled and the Terracoin Core window is minimized, it will no longer appear in your taskbar as a running task. Instead, Terracoin Core will keep running in the background and can be re-opened from the Terracoin icon in the system tray (the area next to your system clock). This option cannot be selected at the same time as Hide tray icon. |
||
| + | |||
| + | =====Minimize on close===== |
||
| + | |||
| + | When this option is enabled, clicking the X button in the top right corner of the window will cause Terracoin Core to minimize rather than close. To completely close the app, select File > Exit. |
||
| + | |||
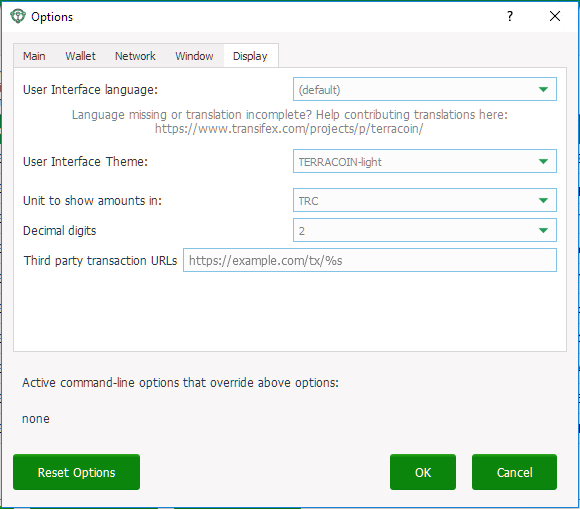
| + | ====Display tab==== |
||
| + | |||
| + | This tab contains options relating to the appearance of the Terracoin Core app window. |
||
| + | |||
| + | [[File:Options Display Tab.png]] |
||
| + | |||
| + | ''The Display tab of the Terracoin Core Options dialog'' |
||
| + | |||
| + | =====User interface language===== |
||
| + | |||
| + | Select your preferred language from this drop-down menu. Changing the language requires you to restart the Terracoin Core app. Terracoin Core currently offers translations in Bulgarian, German, English, Spanish, Finnish, French, Italian, Japanese, Polish, Portuguese (Brazil), Russian, Slovenian, Swedish, Vietnamese, Simplified Chinese and Traditional Chinese. |
||
| + | |||
| + | =====User interface theme===== |
||
| + | |||
| + | You can use this option to select a different theme governing the appearance of the Terracoin Core window. All functionality is identical under the different themes, although the default Terracoin-light theme is most recent and most likely to work without any display artifacts. |
||
| + | |||
| + | =====Unit to show amounts in===== |
||
| + | |||
| + | This allows you to change the default unit of currency in Terracoin Core from TRC to mTRC, µTRC or duffs. Each unit shifts the decimal separator three places to the right. Duffs are the smallest unit into which Terracoin may be separated. |
||
| + | |||
| + | =====Decimal digits===== |
||
| + | |||
| + | This option allows you to select how many decimal digits will be displayed in the user interface. This does not affect internal accounting of your inputs and balance. |
||
| + | |||
| + | =====Third party transaction URLs===== |
||
| + | |||
| + | This option allows you to specify and external website to inspect a particular address or transaction on the blockchain. Several blockchain explorers are available for this. To use this feature, enter the URL of your favorite blockchain explorer, replacing the %s with the transaction ID. You will then be able to access this blockchain explorer directly from Terracoin Core using the context menu of any given transaction. |
||
===Terracoin Core Tools=== |
===Terracoin Core Tools=== |
||
| + | This documentation describes the functionality of theTerracoin Core Tools dialog, available under the Tools menu in Terracoin Core. |
||
| − | ==[[How to install Terracoin Core]]==<!--Leaving these as page links for now until I decide how I want it to work with the menus--> |
||
| + | ====Information==== |
||
| − | ===Terracoin Core Wallet for Linux=== |
||
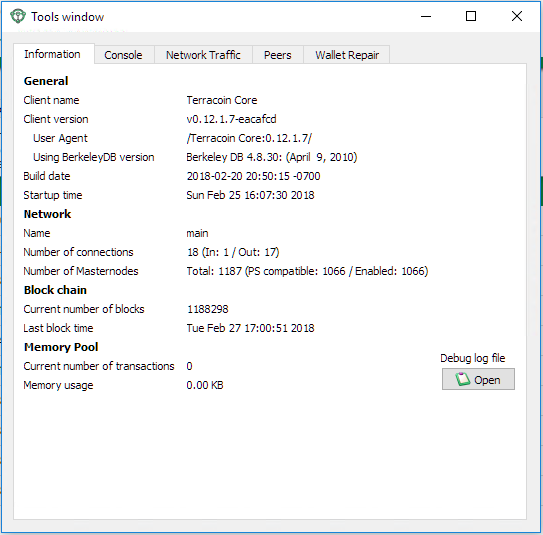
| + | The Information tab of the Tools dialog contains information related to the software and network. |
||
| − | ===Terracoin Core Wallet for macOS=== |
||
| + | [[File:Tools Information.png]] |
||
| − | ===Terracoin Core Wallet for Windows=== |
||
| + | ''The Information tab of the Terracoin Core Tools dialog'' |
||
| − | ==[[How to send and receive Terracoin]]==<!--Leaving these as page links for now until I decide how I want it to work with the menus--> |
||
| + | =====General===== |
||
| − | ==[[How to use PrivateSend]]==<!--Leaving these as page links for now until I decide how I want it to work with the menus--> |
||
| + | |||
| + | This section displays information on the name and version of the client and database, and the location of the current application data directory. |
||
| + | |||
| + | =====Network===== |
||
| + | |||
| + | This section displays information and statistics on the network to which you are connected. |
||
| + | |||
| + | =====Block chain===== |
||
| + | |||
| + | This section shows the current status of the blockchain. |
||
| + | |||
| + | =====Memory pool===== |
||
| + | |||
| + | This section shows the status of the memory pool, which contains transactions that could not yet be written to a block. This includes both transactions created since the last block and transactions which could not be entered in the last block because it was full. |
||
| + | |||
| + | =====Open debug log file===== |
||
| + | |||
| + | This button opens debug.log from the application data directory. This file contains output from Terracoin Core which may help to diagnose errors. |
||
| + | |||
| + | ====Console==== |
||
| + | |||
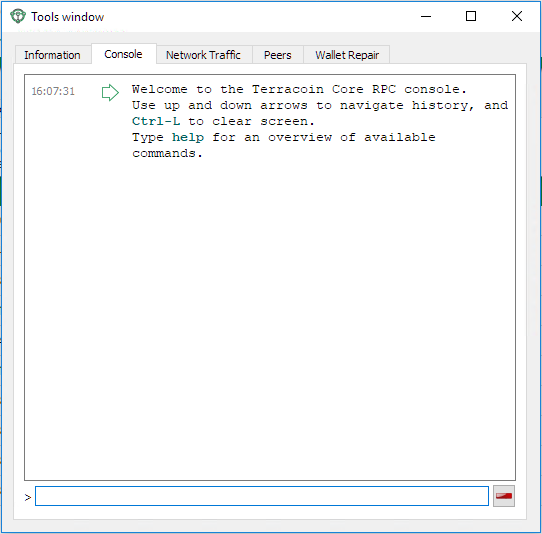
| + | The Console window provides an interface with the Terracoin Core RPC (remote procedure call) console. This is equivalent to the terracoin-cli command on headless versions of Terracoin, such as terracoind running on a masternode. Click the red – icon to clear the console, and see the detailed documentation on RPC commands to learn about the possible commands you can issue. |
||
| + | |||
| + | [[File:Tools Console.png]] |
||
| + | |||
| + | ''The Console tab of the Terracoin Core Tools dialog'' |
||
| + | |||
| + | ====Network Traffic==== |
||
| + | |||
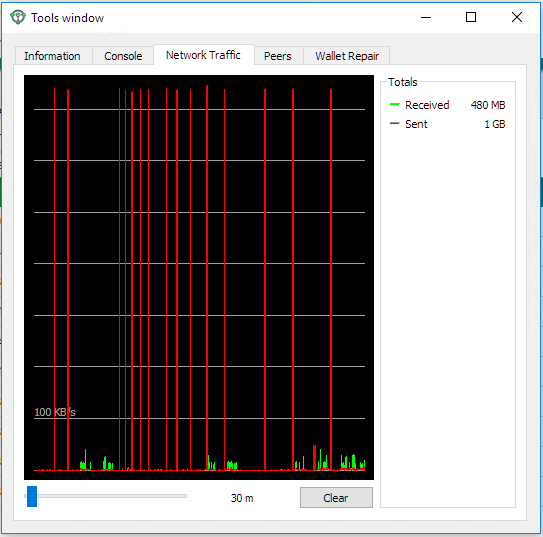
| + | The Network Traffic tab shows a graph of traffic sent and received to peers on the network over time. You can adjust the time period using the slider or Clear the graph. |
||
| + | |||
| + | [[File:Tools Network Traffic.png]] |
||
| + | |||
| + | ''The Network Traffic tab of the Terracoin Core Tools dialog'' |
||
| + | |||
| + | ====Peers==== |
||
| + | |||
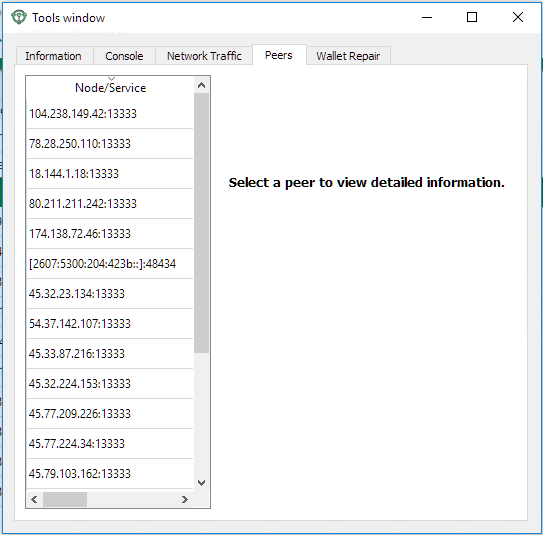
| + | The Peers tab shows a list of other full nodes connected to your Terracoin Core client. The IP address, version and ping time are visible. Selecting a peer shows additional information on the data exchanged with that peer. |
||
| + | |||
| + | [[File:Tools Peers.png]] |
||
| + | |||
| + | ''The Peers tab of the Terracoin Core Tools dialog'' |
||
| + | |||
| + | ====Wallet Repair==== |
||
| + | |||
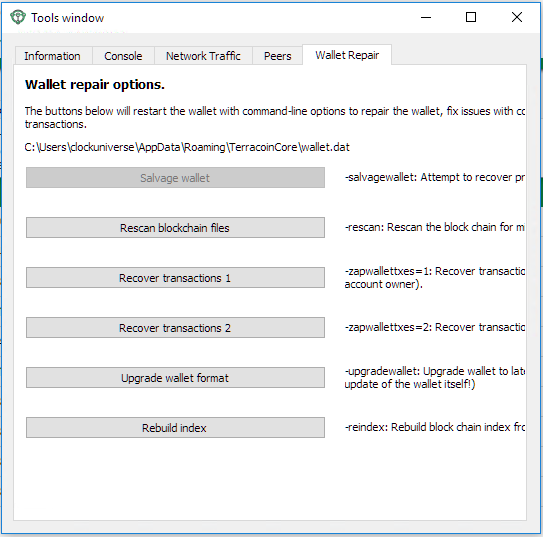
| + | The Wallet Repair tab offers a range of startup commands to restore a wallet to a functional state. Selecting any of these commands will restart Terracoin Core with the specified command-line option. |
||
| + | |||
| + | [[File:Tools Wallet Repair.png]] |
||
| + | |||
| + | ''The Wallet Repair tab of the Terracoin Core Tools dialog'' |
||
| + | |||
| + | ===Salvage wallet=== |
||
| + | |||
| + | Salvage wallet assumes wallet.dat is corrupted and cannot be read. It makes a copy of wallet.dat to wallet.<date>.bak and scans it to attempt to recover any private keys. Check your debug.log file after running salvage wallet and look for lines beginning with "Salvage" for more information on operations completed. |
||
| + | |||
| + | ===Rescan blockchain files=== |
||
| + | |||
| + | Rescans the already downloaded blockchain for any transactions affecting accounts contained in the wallet. This may be necessary if you replace your wallet.dat file with a different wallet or a backup - the wallet logic will not know about these transactions, so a rescan is necessary to determine balances. |
||
| + | |||
| + | ===Recover transactions=== |
||
| + | |||
| + | The recover transactions commands can be used to remove unconfirmed transactions from the memory pool. Your wallet will restart and rescan the blockchain, recovering existing transactions and removing unconfirmed transactions. Transactions may become stuck in an unconfirmed state if there is a conflict in protocol versions on the network during PrivateSend mixing, for example, or if a transaction is sent with insufficient fees when blocks are full. |
||
| + | |||
| + | ===Upgrade wallet format=== |
||
| + | |||
| + | This command is available for very old wallets where an upgrade to the wallet version is required in addition to an update to the wallet software. You can view your current wallet version by running the getinfo command in the console. |
||
| + | |||
| + | ===Rebuild index=== |
||
| + | |||
| + | Discards the current blockchain and chainstate indexes (the database of unspent transaction outputs) and rebuilds it from existing block files. This can be useful to recover missing or stuck balances. |
||
| + | |||
| + | ==How to send and receive Terracoin== |
||
| + | |||
| + | ==Transactions== |
||
| + | |||
| + | Your Terracoin Core Wallet is associated with a number of unique addresses that can be used to send and receive TRC. Each address holds its own balance, and the sum of all your balances is what appears on the Overview tab. When you send Terracoin, your wallet will automatically transfer funds from as many of your addresses as necessary to the destination address, which is controlled by another Terracoin user and associated with their wallet. You can control which addresses you use using the Coin Control feature. |
||
| + | |||
| + | When you confirm a transaction, Terracoin Core will enter the transaction in a block, which will then be added to the blockchain for other clients to confirm. A transaction is generally considered confirmed once six blocks have been added after the block containing your transaction, although masternode and mining payments are only released after 101 blocks. Note that a different process is used for InstantSend and PrivateSend transactions. |
||
| + | |||
| + | Terracoin addresses are 34 characters long and begin with a 1. |
||
| + | |||
| + | ===Sending Terracoin=== |
||
| + | |||
| + | You can use Terracoin Core to send Terracoin from your balance to another user. The receiving user will provide you with a Terracoin address to which you should send the funds. Click the Send tab in the tab bar and enter the destination address in the Pay To field. |
||
| + | |||
| + | [[File:Send Tab No Control.png]] |
||
| + | |||
| + | ''The Terracoin Core Send tab'' |
||
| + | |||
| + | You can also use the three icons to the right of the Pay To field to select a previously used address, paste an address from the clipboard, or clear the current address. If this is a new address, you can enter a name for the address in the Label field to help identify it again later. Finally, enter the amount of Terracoin you want to transfer in the Amount field. |
||
| + | |||
| + | The other options relate to fees and PrivateSend/InstantSend. You can choose if you want to pay the network fee in addition to the amount sent, or subtract it from the amount sent. You can also increase your fee to encourage nodes on the network to prioritize your transaction. Choosing InstantSend has a similar effect, but actually relies on a different mechanism in the second layer network to speed up the transaction time. You can read more about InstantSend here. Choosing PrivateSend will send Terracoin from an address that has previously been mixed. You can find out more about PrivateSend and mixing here. |
||
| + | |||
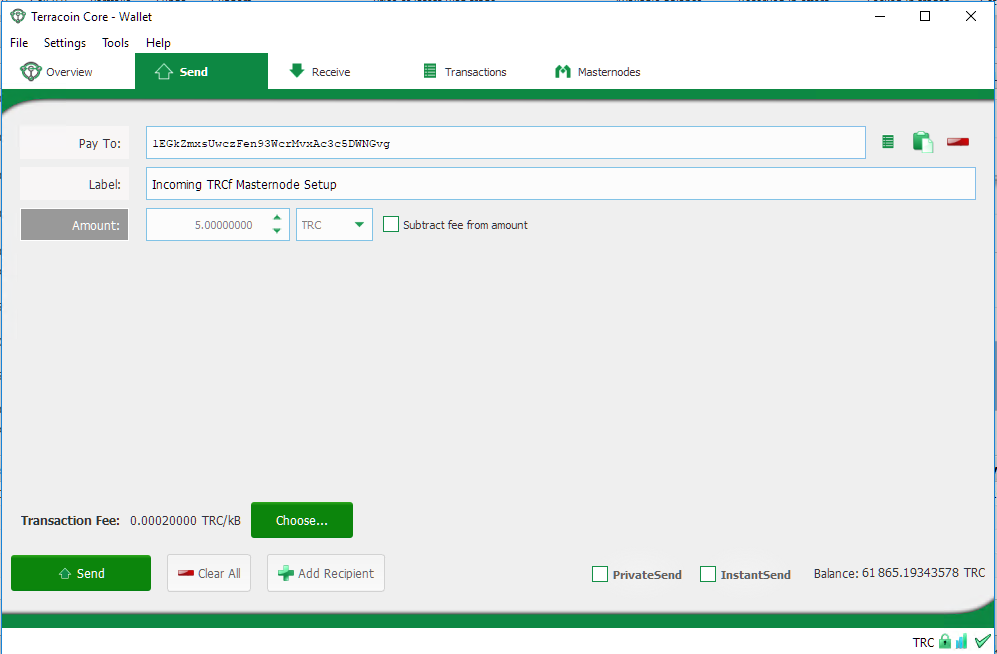
| + | Let’s try an example. Say you have decided to donation 5 TRC to the Terracoin Foundation. |
||
| + | |||
| + | [[File:Send Tab Filled Out.png]] |
||
| + | |||
| + | ''The Send tab filled out for a transaction'' |
||
| + | |||
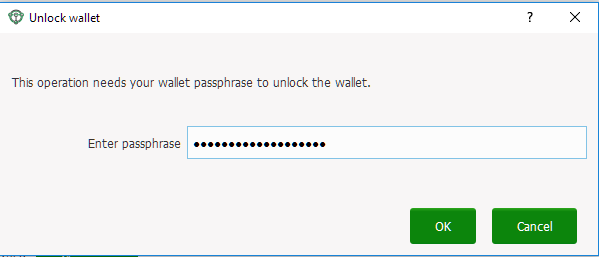
| + | Once you have entered the destination address and the amount, click the Send button. If you have encrypted your wallet, you will now be required to enter your password to unlock the wallet. |
||
| + | |||
| + | [[File:Send Tab Password.png]] |
||
| + | |||
| + | ''Entering the password to unlock the wallet'' |
||
| + | |||
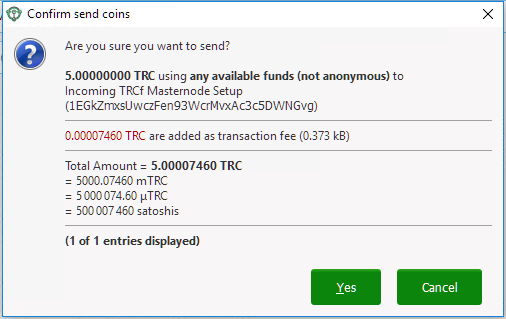
| + | Finally, you are given one final confirmation and chance to cancel your send transaction before Terracoin Core processes the transaction on the blockchain. |
||
| + | |||
| + | [[File:Send Tab Final Confirmation.png]] |
||
| + | |||
| + | ''Final confirmation window'' |
||
| + | |||
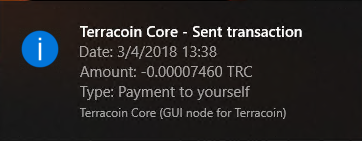
| + | If you respond with Yes, your transaction will be processed. Your operating system may display a notification, and the transaction will appear on the Transactions tab, where you can monitor its progress. |
||
| + | |||
| + | [[File:Send Tab Sent.png]] |
||
| + | |||
| + | ''The Windows 10 sent transaction confirmation notification'' |
||
| + | |||
| + | Note that the amount of the transaction increased by .00007460 Terracoin. This is the transaction fee. In the next section, we will see what this procedure looks like from the receiving side. |
||
| + | |||
| + | ===Receiving Terracoin=== |
||
| + | |||
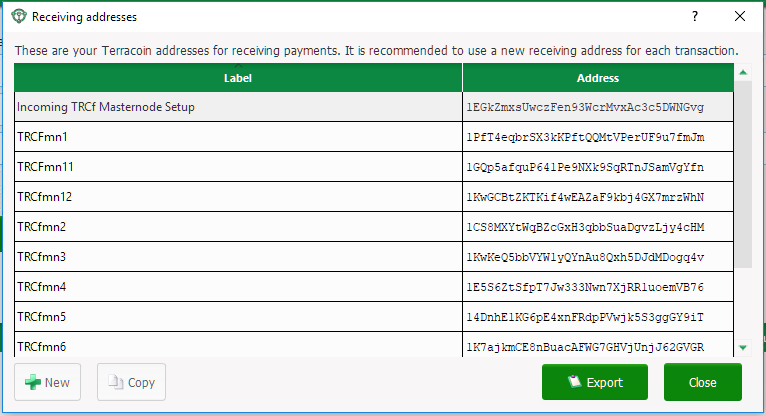
| + | To receive Terracoin, you must first create a receiving address to give to the sending party. To do this, click File > Receiving addresses. The Receiving addresses window appears. |
||
| + | |||
| + | [[File:Receive Addresses.png]] |
||
| + | |||
| + | ''The Receiving addresses window'' |
||
| + | |||
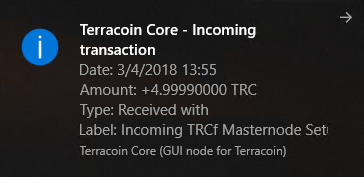
| + | Either copy an existing address by clicking on the address and then the Copy button, or create a new address by clicking the New button. You can also edit an existing address by right clicking and selecting Edit address from the context menu. Give this address to the person who will send you Terracoin. Your wallet does not need to be open to receive funds, but if it is, you can watch the transaction arrive in real time. This is because your wallet constantly watches for new blocks on the blockchain when it is open, and will recognize a new transaction involving your receiving address when it occurs. |
||
| + | |||
| + | [[File:Incoming Transaction.png]] |
||
| + | |||
| + | ''The Windows 10 received transaction confirmation notification'' |
||
| + | |||
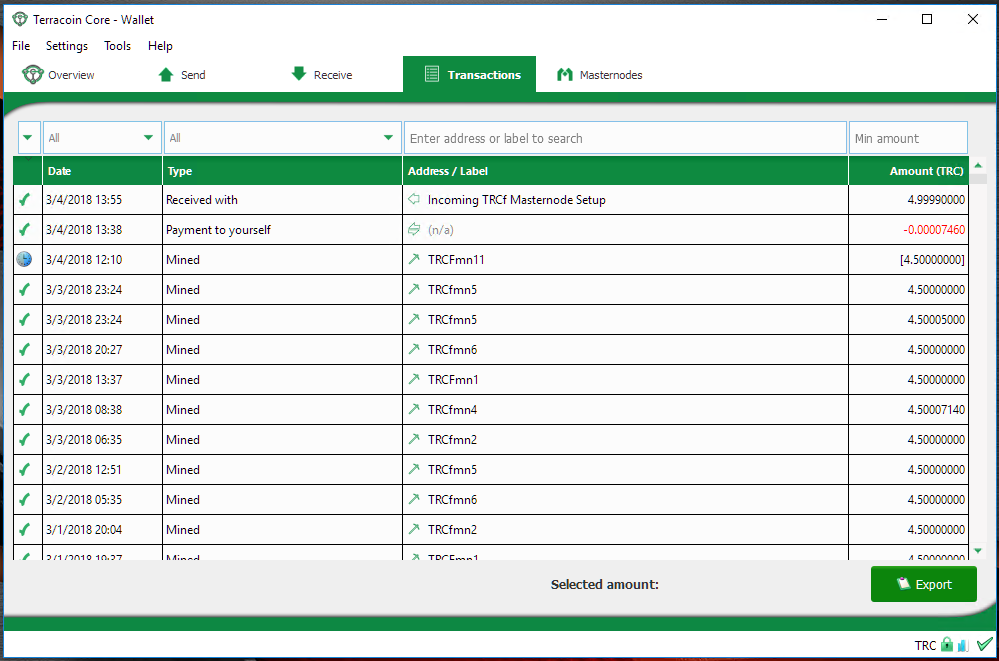
| + | Once you have been paid, you can see the balance both on the Overview tab and on the Transactions tab. |
||
| + | |||
| + | [[File:Transactions 2.png]] |
||
| + | |||
| + | ''The received transaction'' |
||
| + | |||
| + | ==How to use PrivateSend== |
||
| + | |||
| + | Below describes how to use the Terracoin client to run PrivateSend and anonymize your Terracoin. PrivateSend, rebranded from DarkSend in May 2016, is a trustless method of running a sequence of transactions such that an external observer is unable to determine the source of funding when a PrivateSend transaction is created. This gives your Terracoin the same anonymous properties as cash withdrawn from an ATM, for example. By using this software, you agree not to use it for illegal purposes and that you are solely responsible for any lost Terracoin. |
||
===Introduction to PrivateSend=== |
===Introduction to PrivateSend=== |
||
| + | |||
| + | With the introduction of Release Candidate 4 (RC4) of the Darkcoin client, it became possible to store pre-mixed, denominated Terracoin in the user’s wallet, to be used instantly at any time the user desires. The mixing and denomination process is seamless, automatic, and requires no intervention on the part of the user. The current implementation of PrivateSend in the Terracoin Core wallet allows any amount of Terracoin to be mixed for later use in PrivateSend transactions. |
||
| + | |||
| + | Here's how it works: |
||
| + | |||
| + | *Every 10 blocks, user clients network-wide will send any unmixed, traceable Terracoin in their possession through an anonymization phase. In this phase, masternodes are used in chained succession to mix the coins they receive from the network and break them down into homogenous denominations. |
||
| + | *After being processed by a minimum of 2 masternodes, the coins are either sent to the next masternode in the chain or back to the user’s wallet at randomly generated change addresses. |
||
| + | *Depending on the desired depth of security and privacy, users may select between 2 and 8 “hops” to successive masternodes before their coins are sent back to the client. Hops are made every 10 blocks, so anonymization at a depth of 2 hops will take 2*2.5=5.0 minutes, 3 hops 3*2.5=7.5 minutes, and so on. The desired mixing depth can be selected in the client GUI. |
||
| + | *At the end of the anonymization phase, the user’s coins are returned to their client at randomly generated change addresses. When the user wishes to make a transaction, the client forwards the intended amount from these anonymous change addresses directly to the intended receiver’s address. There is no direct involvement of of masternodes in the final person-to-person transaction. |
||
| + | *Proof of payment will work as it always has: a user can see the send transaction with the receiver’s address in their own wallet, and the blockchain will show that the receiver’s address received an input in the corresponding amount. |
||
===Setting default PrivateSend options=== |
===Setting default PrivateSend options=== |
||
| + | |||
| + | 1. Open your Terracoin Core wallet, go to Settings and select Options. Go to the Wallet tab. |
||
| + | |||
| + | [[File:PrivateSend Options Wallet.png]] |
||
| + | |||
| + | ''Terracoin Options Wallet PrivateSend Advanced'' |
||
| + | |||
| + | 2. Next to PrivateSend rounds to use, enter a value between 1-8. |
||
| + | |||
| + | Each round of PrivateSend performs one denominated fund mixing transaction. Higher numbers of rounds increase your overall level of anonymity while decreasing the chance of detection via node collusion. 8 is the highest number of rounds currently available. |
||
| + | |||
| + | NOTE: each round of PrivateSend includes a masternode fee of 0.0125 Terracoin. |
||
| + | |||
| + | 3. Enter a target value for Amount of Terracoin to keep anonymized. |
||
| + | |||
| + | This value provides a lower boundary on the final amount of funds to be anonymized. Depending on how the client splits your wallet balance, you may end up with denominated inputs whose sum total is greater than the target amount. In this case the client will use all existing denominated inputs in the PrivateSend process. The final anonymized amount may be higher than your target, but should be close. |
||
| + | |||
| + | 4. Click OK to save settings. |
||
| + | |||
| + | 5. PrivateSend is disabled by default when you open the wallet. It will only start after you set the number of rounds and number of Terracoin to mix under settings and click Start Mixing on the Overview tab of your wallet. |
||
===Initiating the PrivateSend process=== |
===Initiating the PrivateSend process=== |
||
| + | |||
| + | The PrivateSend process is initiated by clicking the Start Mixing button on the Overview tab of the Terracoin Core wallet. Mixing is possible once the following conditions have been met: |
||
| + | |||
| + | The wallet contains sufficient non-anonymized funds to create the minimum required denominated values |
||
| + | The user has not disabled PrivateSend in the Options dialog |
||
| + | The target value for anonymized Funds in the Options dialog is greater than zero |
||
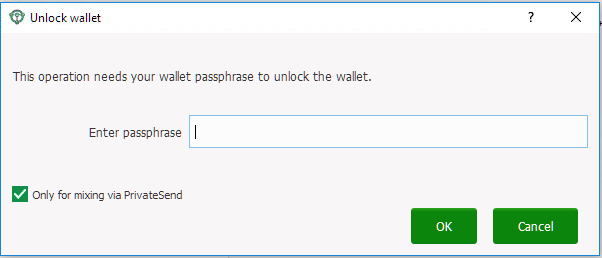
| + | If your wallet is encrypted (highly recommended), you will be asked to enter your wallet passphrase. Enable the Only for mixing via PrivateSend checkbox to unlock the wallet for mixing only. |
||
| + | |||
| + | [[File:PrivateSend Password.png]] |
||
| + | |||
| + | ''Entering a password for PrivateSend mixing only'' |
||
| + | |||
| + | This will unlock your wallet, and the PrivateSend mixing process will begin. The wallet will remain unlocked until PrivateSend mixing is complete, at which point it will be locked automatically. |
||
| + | |||
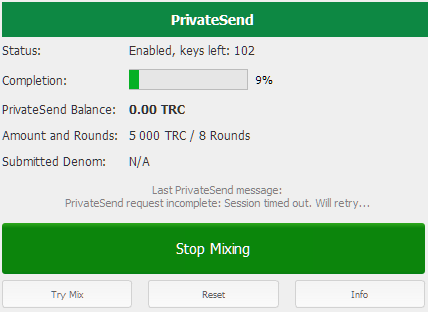
| + | [[File:PrivateSend Progress.png]] |
||
| + | |||
| + | ''PrivateSend interface after clicking the Start Mixing button. Note the Status is Enabled.'' |
||
| + | |||
| + | PrivateSend will begin creating transactions and your PrivateSend balance will gradually increase. This process can take some time, so be patient. You can monitor the process in more detail as described here. |
||
| + | |||
| + | Any of the following actions will interrupt the mixing process. Because the transactions are atomic (they either take place completely, or do not take place at all), it should be possible to safely interrupt PrivateSend mixing at any time. |
||
| + | |||
| + | Clicking the Stop Mixing button on the Overview tab |
||
| + | Closing the client before PrivateSend mixing is completed |
||
| + | Sending PrivateSend funds from the wallet before PrivateSend rounds are completed |
||
| + | Disabling PrivateSend before the process is complete |
||
===Monitoring PrivateSend progress=== |
===Monitoring PrivateSend progress=== |
||
| + | |||
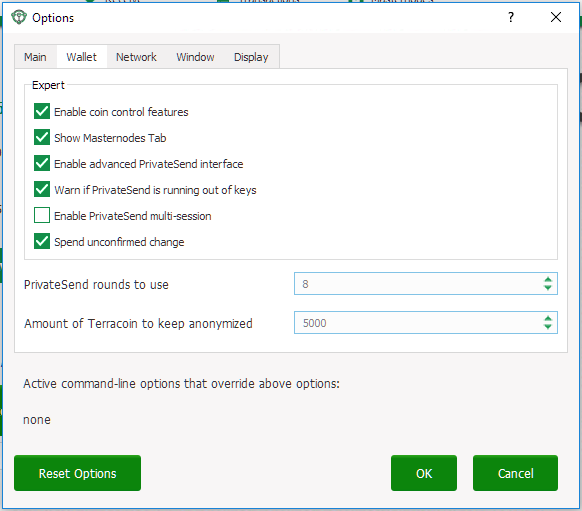
| + | If you want to monitor PrivateSend in more detail, you need to enable some advanced features of the wallet. Go to Settings, select Options and go to the Wallet tab. Check the boxes next to the Enable coin control features and Enable advanced PrivateSend interface options. |
||
| + | |||
| + | [[File:PrivateSend Options Interface.png]] |
||
| + | |||
| + | ''Enabling advanced options for PrivateSend in the Terracoin Core wallet settings'' |
||
| + | |||
| + | This will allow you to monitor progress and see which individual operations PrivateSend is carrying out in the background. |
||
| + | |||
| + | [[File:PrivateSend Progress.png]] |
||
| + | |||
| + | ''Monitoring PrivateSend progress'' |
||
| + | |||
| + | This will allow you to monitor progress and see which individual operations PrivateSend is carrying out in the background. |
||
| + | |||
| + | Since PrivateSend mixing creates a lot of new address keys to send and receive the anonymized denominations, you may receive a warning when the number of remaining keys runs low. This is nothing to be worried about, since the wallet will simply create more keys as necessary. However, these keys will not exist in any previous backups of your wallet. For this reason, it is important to backup your wallet again after mixing is complete. |
||
| + | |||
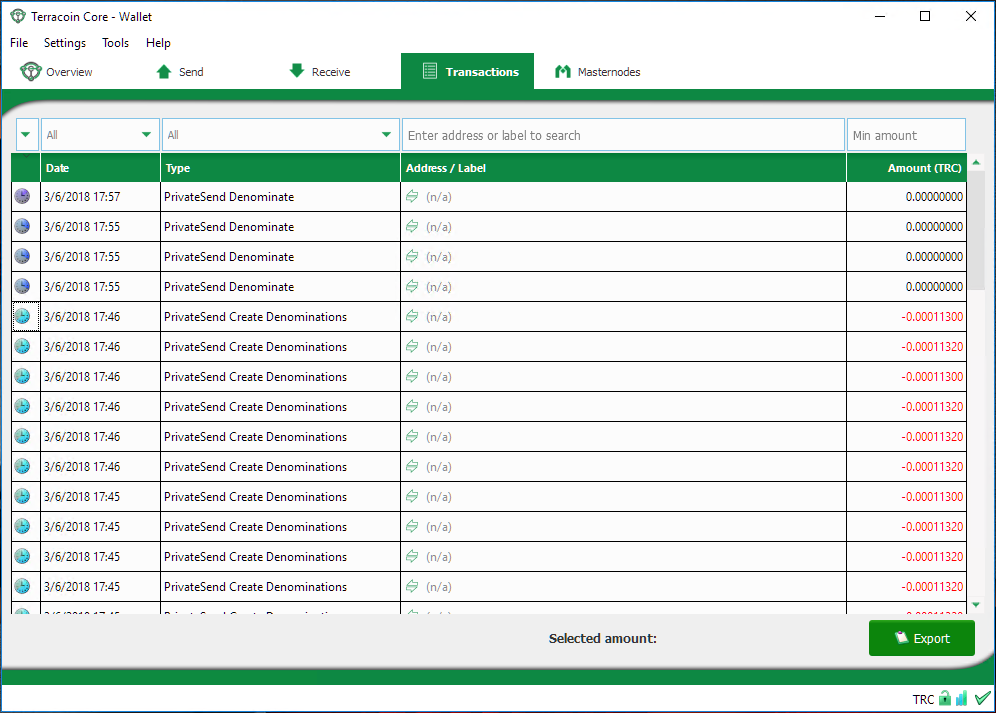
| + | You can also monitor PrivateSend progress by viewing the transactions created by the mixing process on the Transactions tab. |
||
| + | |||
| + | [[File:PrivateSend Transactions.png]] |
||
| + | |||
| + | ''Transactions created by PrivateSend on the Transactions tab'' |
||
| + | |||
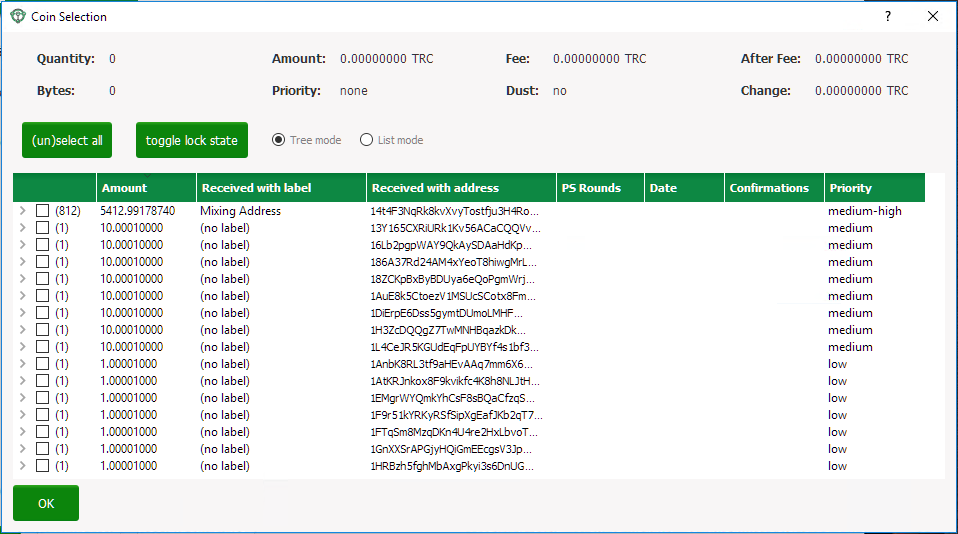
| + | You can also use the coin control feature to view which addresses hold mixed denominations ready to be used for PrivateSend transactions. Go to the Send tab of your wallet and click Inputs to view the possible input addresses for your transactions. You can see how each address holds given denominations of mixed Terracoin, and how many rounds of mixing have been completed. This is to ensure that an efficient combination of addresses can be used as inputs in PrivateSend transactions without too much change, since amount in a PrivateSend transaction must be rounded up to completely spend all inputs. The current minimum balance for an input used in a PrivateSend transaction is 0.01000010 Terracoin. |
||
| + | |||
| + | [[File:PrivateSend Denominations.png]] |
||
| + | |||
| + | ''Coin Selection dialog showing addresses holding PrivateSend mixed balances in different denominations'' |
||
===Sending payments with PrivateSend=== |
===Sending payments with PrivateSend=== |
||
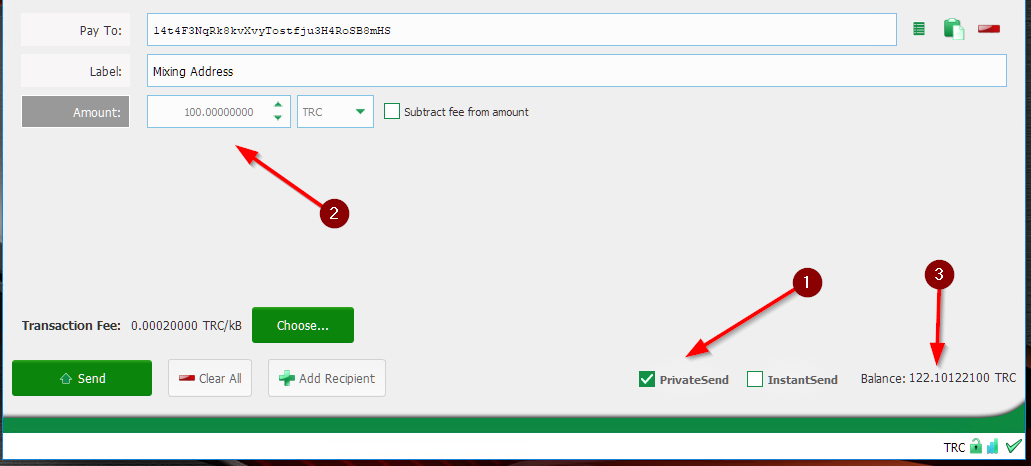
| + | You can only use PrivateSend for payments once you have mixed enough Terracoin to make up the amount you are trying to send. Because the mixing process takes time, it must be done in advance before you create the send transaction. A PrivateSend transaction is effectively the same as any other transaction on the blockchain, but it draws only from input addresses where the denomination has previously been mixed to ensure anonymity of funds. Because several input addresses are usually required to make up the amount you are trying to send, a PrivateSend transaction will usually take up more space (in kilobytes) on the blockchain, and therefore will be charged a slightly higher fee. To send a payment using PrivateSend, go to the Send tab of the Terracoin Core wallet and enable the PrivateSend option. The balance displayed will change to show your PrivateSend balance instead of the total balance. You can then enter the Pay To address, Label, Amount and click Send as usual. Your payment will be rounded up to completely spend the lowest possible denomination of mixed balance available (currently to the nearest 0.01 TRC). You will be prompted to enter your password and receive a detailed breakdown of the fee structure for PrivateSend before sending. |
||
| − | ==[[How to safely back up your wallet]]==<!--Leaving these as page links for now until I decide how I want it to work with the menus--> |
||
| + | [[File:PrivateSend Ready.png]] |
||
| − | ==[[Guides for advanced functions]]==<!--Leaving these as page links for now until I decide how I want it to work with the menus--> |
||
| + | ''Terracoin Core ready to send a PrivateSend transaction. Note PrivateSend is enabled and the amount to be sent is less than the available PrivateSend balance'' |
||
| − | ===Terracoin Core video guides=== |
||
| + | |||
| + | ==How to safely back up your wallet== |
||
| + | |||
| + | ===Introduction=== |
||
| + | |||
| + | This documentation describes how to safely back up your wallet file for safe storage in case your computer or laptop is damaged or lost. Terracoin Core stores all data necessary to control your Terracoin addresses in a single file called wallet.dat. This wallet is in the Berkeley DB format and stores the pairs of private/public cryptographic keys used to manage your balances on the Terracoin blockchain. Terracoin Core makes most of these operations transparent and even generates automatic backups of your wallet file in case it is corrupted, but the user is responsible for ensuring that these backups are stored in a safe place. If you lose access to these key pairs, you will permanently lose access to your Terracoin. |
||
| + | |||
| + | It is important to consider that if you have not encrypted your wallet using the Settings > Encrypt Wallet menu item, anyone with access to the backed up wallet.dat file will immediately have full access to your Terracoin. If you do choose to encrypt your wallet, do not store the password in the same place as the wallet.dat file, particularly if you are saving the backup to the cloud. |
||
| + | |||
| + | ===Backing up your wallet=== |
||
| + | |||
| + | ====Backing up from Terracoin Core==== |
||
| + | |||
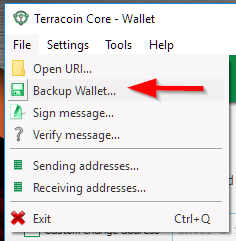
| + | Firstly, never copy your wallet.dat file while Terracoin Core is open. Always use the File > Backup Wallet menu if the wallet is open. When you select this menu item, a dialog box will appear to specify where the file should be saved. Enter a name for the file, select a location and click Save. The example below shows saving the file to a USB stick. Keep this file in a physically separate location to your computer. |
||
| + | |||
| + | [[File:Backup Wallet.png]] |
||
| + | |||
| + | ''Backing up the Terracoin Core wallet from the File menu'' |
||
| + | |||
| + | ====Backing up by copying the wallet.dat file==== |
||
| + | |||
| + | If Terracoin Core is not running, you can also backup your wallet by simply copying the wallet.dat file to another location. This file is located in the TerracoinCore data folder. You were given the option to specify the location of this folder during installation, but by default the folder is in the following locations on different operating systems: |
||
| + | |||
| + | *Windows |
||
| + | C:\Users\YourUserName\Appdata\Roaming\TerracoinCore |
||
| + | You can access this folder directly by Windows Key + R and typing %APPDATA%\TerracoinCore |
||
| + | *Linux |
||
| + | /home/YourUserName/.terracoincore |
||
| + | You can access this folder directly by typing cd ~/.terracoincore at the terminal or ~/.terracoincore in the path bar using the Go > Enter Location... menu item in Files |
||
| + | *macOS |
||
| + | /Users/YourUserName/Library/Application Support/TerracoinCore |
||
| + | You can access this folder by typing cd ~/Library/Application Support/TerracoinCore at the terminal or ~/Library/Application Support/TerracoinCore in dialog at the Go > Go To Folder menu item in Finder |
||
| + | Ensure Terracoin Core is not running, then simply copy the wallet.dat file from this folder to another folder in the normal way for your operating system. The example below shows copying the file to a USB stick using simple drag and drop while holding down Ctrl on a Windows system. On most operating systems, you can also right click on the file and select Copy, then select Paste in the target folder. Keep this file in a physically separate location to your computer. Be careful to copy (not move) the file! |
||
| + | |||
| + | ===Automatic backups=== |
||
| + | |||
| + | Every time you open Terracoin Core, it will automatically create a backup copy of wallet.dat in the terracoincore/backups folder. Up to 10 backups can be kept here by default, and the oldest backup will be deleted as each additional new backup is created. You can modify the number of backups kept here using the -createwalletbackups=n parameter at the command line or in terracoin.conf. Setting this value to 0 completely disables backups. |
||
| + | |||
| + | You can view the automatic backups folder by browsing to TerracoinCore folder at the location specified above for wallet.dat and opening the backups folder, or by selecting Tools > Show Automatic Backups from the menu in Terracoin Core. Since these files are not active when Terracoin Core is running, you can safely copy them at any time. They are also a handy backup if the original files in the TerracoinCore folder become corrupted due to improper shutdown of the Terracoin Core app. |
||
| + | |||
| + | ===Restoring backups=== |
||
| + | |||
| + | To restore a backup, install Terracoin Core on the target system (or stop it, if already installed) and rename the existing wallet.dat file in the TerracoinCore folder. |
||
| + | |||
| + | Then copy the backup wallet file to the TerracoinCore folder and ensure it is named wallet.dat. Now, when you start Terracoin Core again, it will load the new wallet. Do not replace wallet.dat while Terracoin Core is running, since this will result in data corruption! |
||
| + | |||
| + | ===Backup storage considerations=== |
||
| + | |||
| + | Any backup depends to some extent on the existence of software capable of reading the data at some future point in time. As such, it is good practice to store a copy of the software used to create the backup together with the backup file itself. In this case, this would be a copy of the version of Terracoin Core you used to create the backup. |
||
| + | |||
| + | The wallet.dat file itself should be encrypted using a password set from the Settings > Encrypt Wallet menu item. However, this only prevents someone with access to the file from creating transactions, not from opening the file. You could additionally store the file in another encrypted container, such as a USB stick using BitLocker in Windows, LUKS in Linux or FileVault on macOS. It is also possible to create disk images or zip files with password encryption - the choice is yours. For further reading on encrypted containers, see here. |
||
| + | |||
| + | Where you store this file is then up to you. It could be in your home, in a safe deposit box at a bank, a waterproof container, or on cloud storage such as Google Drive or iCloud. Consider where you will store any passwords needed to restore access to the wallet (in your head, on paper, in a password manager, etc.) and who may need access to the password in the future. |
||
| + | |||
| + | Finally it is important to understand that wallet.dat itself is a relatively dangerous way to store large amounts of funds - it is simply a database file storing private keys. While the convenience of storing a wallet file directly is fine for smaller holdings, it is more secure to to store large amounts of Terracoin on a single predefined address in a way that you are guaranteed access through any software supporting the protocol, rather than a specific implementation of that protocol. If you are interested in this, read more about paper wallets, where the private key can be printed directly or also encrypted using BIP38 for safe storage. |
||
| + | |||
| + | ===Verifying backups=== |
||
| + | |||
| + | There is no fixed procedure to verify your backup, but you should test restoring it at least once to make sure it works. If you have a simple copy of the file, try to restore it to your current TerracoinCore folder and start Terracoin Core to make sure it opens without any errors. If you decided to store the file in an encrypted zip file, make sure you can unzip it and that it opens correctly in Terracoin Core. In short, make sure that you (or the person you are trusting to eventually go through this process for you) can actually reverse your backup process to get access to your Terracoin, instead of relying on the fact that this process should theoretically be reversible. |
||
| + | |||
| + | ==Guides for advanced functions== |
||
| + | |||
| + | Below are the advanced functions. |
||
===Enable the Masternodes tab=== |
===Enable the Masternodes tab=== |
||
| + | You need to enable the wallet's Masternodes tab from the Options menu. |
||
| − | ===How to run multiple wallets=== |
||
| + | |||
| + | #From the wallet, select (Mac OSX) Terracoin Core => Preferences or (Windows) Settings => Optons... |
||
| + | #Click the Wallet tab. |
||
| + | #Check Enable coin control features and Show Masternodes Tab. |
||
| + | #Click OK |
||
| + | #Restart your wallet. |
||
| + | |||
| + | If your masternode.conf file has masternode entries, the Masternodes tab will now display. |
||
| + | <!--===How to run multiple wallets===Update at some point--> |
||
===Command line arguments=== |
===Command line arguments=== |
||
| + | |||
| + | These commands are accurate as of Terracoin Core version 0.12.1.8. |
||
| + | |||
| + | terracoind |
||
| + | |||
| + | terracoin-qt |
||
| + | |||
| + | terracoin-cli |
||
| + | |||
| + | terracoin-tx |
||
| + | |||
| + | ====terracoind==== |
||
| + | |||
| + | =====TerracoinCore Daemon===== |
||
| + | |||
| + | Usage: |
||
| + | terracoind [options] Start terracoin Core Daemon |
||
| + | |||
| + | Options: |
||
| + | -? This help message |
||
| + | -version Print version and exit |
||
| + | -alerts Receive and display P2P network alerts (default: 1) |
||
| + | -alertnotify=<cmd> Execute command when a relevant alert is received or we see a really long fork (%s in cmd is replaced by message) |
||
| + | -blocknotify=<cmd> Execute command when the best block changes (%s in cmd is replaced by block hash) |
||
| + | -assumevalid=<hex> If this block is in the chain assume that it and its ancestors are valid and potentially skip their script verification (0 to verify all, default: 00000000000000b4181bbbdddbae464ce11fede5d0292fb63fdede1e7c8ab21c, testnet: 00000ce22113f3eb8636e225d6a1691e132fdd587aed993e1bc9b07a0235eea4) |
||
| + | -conf=<file> Specify configuration file (default: terracoin.conf) |
||
| + | -daemon Run in the background as a daemon and accept commands |
||
| + | -datadir=<dir> Specify data directory |
||
| + | -dbcache=<n> Set database cache size in megabytes (4 to 16384, default: 100) |
||
| + | -loadblock=<file> Imports blocks from external blk000??.dat file on startup |
||
| + | -maxorphantx=<n> Keep at most <n> unconnectable transactions in memory (default: 100) |
||
| + | -maxmempool=<n> Keep the transaction memory pool below <n> megabytes (default: 300) |
||
| + | -mempoolexpiry=<n> Do not keep transactions in the mempool longer than <n> hours (default: 72) |
||
| + | -par=<n> Set the number of script verification threads (-1 to 16, 0 = auto, <0 = leave that many cores free, default: 0) |
||
| + | -pid=<file> Specify pid file (default: terracoind.pid) |
||
| + | -prune=<n> Reduce storage requirements by pruning (deleting) old blocks. This mode is incompatible with -txindex and -rescan. Warning: Reverting this setting requires re-downloading the entire blockchain. (default: 0 = disable pruning blocks, >945 = target size in MiB to use for block files) |
||
| + | -reindex-chainstate Rebuild chain state from the currently indexed blocks |
||
| + | -reindex Rebuild chain state and block index from the blk*.dat files on disk |
||
| + | -sysperms Create new files with system default permissions, instead of umask 077 (only effective with disabled wallet functionality) |
||
| + | -txindex Maintain a full transaction index, used by the getrawtransaction rpc call (default: 1) |
||
| + | -addressindex Maintain a full address index, used to query for the balance, txids and unspent outputs for addresses (default: 0) |
||
| + | -timestampindex Maintain a timestamp index for block hashes, used to query blocks hashes by a range of timestamps (default: 0) |
||
| + | -spentindex Maintain a full spent index, used to query the spending txid and input index for an outpoint (default: 0) |
||
| + | |||
| + | Connection options: |
||
| + | -addnode=<ip> Add a node to connect to and attempt to keep the connection open |
||
| + | -banscore=<n> Threshold for disconnecting misbehaving peers (default: 100) |
||
| + | -bantime=<n> Number of seconds to keep misbehaving peers from reconnecting (default: 86400) |
||
| + | -bind=<addr> Bind to given address and always listen on it. Use [host]:port notation for IPv6 |
||
| + | -connect=<ip> Connect only to the specified node(s) |
||
| + | -discover Discover own IP addresses (default: 1 when listening and no -externalip or -proxy) |
||
| + | -dns Allow DNS lookups for -addnode, -seednode and -connect (default: 1) |
||
| + | -dnsseed Query for peer addresses via DNS lookup, if low on addresses (default: 1 unless -connect) |
||
| + | -externalip=<ip> Specify your own public address |
||
| + | -forcednsseed Always query for peer addresses via DNS lookup (default: 0) |
||
| + | -listen Accept connections from outside (default: 1 if no -proxy or -connect) |
||
| + | -listenonion Automatically create Tor hidden service (default: 1) |
||
| + | -maxconnections=<n> Maintain at most <n> connections to peers (temporary service connections excluded) (default: 125) |
||
| + | -maxreceivebuffer=<n> Maximum per-connection receive buffer, <n>*1000 bytes (default: 5000) |
||
| + | -maxsendbuffer=<n> Maximum per-connection send buffer, <n>*1000 bytes (default: 1000) |
||
| + | -onion=<ip:port> Use separate SOCKS5 proxy to reach peers via Tor hidden services (default: -proxy) |
||
| + | -onlynet=<net> Only connect to nodes in network <net> (ipv4, ipv6 or onion) |
||
| + | -permitbaremultisig Relay non-P2SH multisig (default: 1) |
||
| + | -peerbloomfilters Support filtering of blocks and transaction with bloom filters (default: 1) |
||
| + | -port=<port> Listen for connections on <port> (default: 9999 or testnet: 19999) |
||
| + | -proxy=<ip:port> Connect through SOCKS5 proxy |
||
| + | -proxyrandomize Randomize credentials for every proxy connection. This enables Tor stream isolation (default: 1) |
||
| + | -seednode=<ip> Connect to a node to retrieve peer addresses, and disconnect |
||
| + | -timeout=<n> Specify connection timeout in milliseconds (minimum: 1, default: 5000) |
||
| + | -torcontrol=<ip>:<port> Tor control port to use if onion listening enabled (default: 127.0.0.1:9051) |
||
| + | -torpassword=<pass> Tor control port password (default: empty) |
||
| + | -upnp Use UPnP to map the listening port (default: 0) |
||
| + | -whitebind=<addr> Bind to given address and whitelist peers connecting to it. Use [host]:port notation for IPv6 |
||
| + | -whitelist=<netmask> Whitelist peers connecting from the given netmask or IP address. Can be specified multiple times. Whitelisted peers cannot be DoS banned and their transactions are always relayed, even if they are already in the mempool, useful e.g. for a gateway |
||
| + | -whitelistrelay Accept relayed transactions received from whitelisted peers even when not relaying transactions (default: 1) |
||
| + | -whitelistforcerelay Force relay of transactions from whitelisted peers even they violate local relay policy (default: 1) |
||
| + | -maxuploadtarget=<n> Tries to keep outbound traffic under the given target (in MiB per 24h), 0 = no limit (default: 0) |
||
| + | |||
| + | Wallet options: |
||
| + | -disablewallet Do not load the wallet and disable wallet RPC calls |
||
| + | -keypool=<n> Set key pool size to <n> (default: 1000) |
||
| + | -fallbackfee=<amt> A fee rate (in TRC/kB) that will be used when fee estimation has insufficient data (default: 0.0002) |
||
| + | -mintxfee=<amt> Fees (in TRC/kB) smaller than this are considered zero fee for transaction creation (default: 0.0001) |
||
| + | -paytxfee=<amt> Fee (in TRC/kB) to add to transactions you send (default: 0.00) |
||
| + | -rescan Rescan the block chain for missing wallet transactions on startup |
||
| + | -salvagewallet Attempt to recover private keys from a corrupt wallet.dat on startup |
||
| + | -sendfreetransactions Send transactions as zero-fee transactions if possible (default: 0) |
||
| + | -spendzeroconfchange Spend unconfirmed change when sending transactions (default: 1) |
||
| + | -txconfirmtarget=<n> If paytxfee is not set, include enough fee so transactions begin confirmation on average within n blocks (default: 2) |
||
| + | -maxtxfee=<amt> Maximum total fees (in TRC) to use in a single wallet transaction; setting this too low may abort large transactions (default: 0.20) |
||
| + | -usehd Use hierarchical deterministic key generation (HD) after bip39/bip44. Only has effect during wallet creation/first start (default: 0) |
||
| + | -mnemonic User defined mnemonic for HD wallet (bip39). Only has effect during wallet creation/first start (default: randomly generated) |
||
| + | -mnemonicpassphrase User defined mnemonic passphrase for HD wallet (bip39). Only has effect during wallet creation/first start (default: empty string) |
||
| + | -hdseed User defined seed for HD wallet (should be in hex). Only has effect during wallet creation/first start (default: randomly generated) |
||
| + | -upgradewallet Upgrade wallet to latest format on startup |
||
| + | -wallet=<file> Specify wallet file (within data directory) (default: wallet.dat) |
||
| + | -walletbroadcast Make the wallet broadcast transactions (default: 1) |
||
| + | -walletnotify=<cmd> Execute command when a wallet transaction changes (%s in cmd is replaced by TxID) |
||
| + | -zapwallettxes=<mode> Delete all wallet transactions and only recover those parts of the blockchain through -rescan on startup (1 = keep tx meta data e.g. account owner and payment request information, 2 = drop tx meta data) |
||
| + | -createwalletbackups=<n> Number of automatic wallet backups (default: 10) |
||
| + | -walletbackupsdir=<dir> Specify full path to directory for automatic wallet backups (must exist) |
||
| + | -keepass Use KeePass 2 integration using KeePassHttp plugin (default: 0) |
||
| + | -keepassport=<port> Connect to KeePassHttp on port <port> (default: 19455) |
||
| + | -keepasskey=<key> KeePassHttp key for AES encrypted communication with KeePass |
||
| + | -keepassid=<name> KeePassHttp id for the established association |
||
| + | -keepassname=<name> Name to construct url for KeePass entry that stores the wallet passphrase |
||
| + | |||
| + | ZeroMQ notification options: |
||
| + | -zmqpubhashblock=<address> Enable publish hash block in <address> |
||
| + | -zmqpubhashtx=<address> Enable publish hash transaction in <address> |
||
| + | -zmqpubhashtxlock=<address> Enable publish hash transaction (locked via InstantSend) in <address> |
||
| + | -zmqpubrawblock=<address> Enable publish raw block in <address> |
||
| + | -zmqpubrawtx=<address> Enable publish raw transaction in <address> |
||
| + | -zmqpubrawtxlock=<address> Enable publish raw transaction (locked via InstantSend) in <address> |
||
| + | |||
| + | Debugging/Testing options: |
||
| + | -uacomment=<cmt> Append comment to the user agent string |
||
| + | -debug=<category> Output debugging information (default: 0, supplying <category> is optional). If <category> is not supplied or if <category> = 1, output all debugging information.<category> can be: addrman, alert, bench, coindb, db, http, libevent, lock, mempool, mempoolrej, net, proxy, prune, rand, reindex, rpc, selectcoins, tor, zmq, terracoin (or specifically: gobject, instantsend, keepass, masternode, mnpayments, mnsync, privatesend, spork). |
||
| + | -gen Generate coins (default: 0) |
||
| + | -genproclimit=<n> Set the number of threads for coin generation if enabled (-1 = all cores, default: 1) |
||
| + | -help-debug Show all debugging options (usage: --help -help-debug) |
||
| + | -logips Include IP addresses in debug output (default: 0) |
||
| + | -logtimestamps Prepend debug output with timestamp (default: 1) |
||
| + | -minrelaytxfee=<amt> Fees (in TRC/kB) smaller than this are considered zero fee for relaying, mining and transaction creation (default: 0.0001) |
||
| + | -printtoconsole Send trace/debug info to console instead of debug.log file |
||
| + | -printtodebuglog Send trace/debug info to debug.log file (default: 1) |
||
| + | -shrinkdebugfile Shrink debug.log file on client startup (default: 1 when no -debug) |
||
| + | |||
| + | Chain selection options: |
||
| + | -testnet Use the test chain |
||
| + | -litemode=<n> Disable all Terracoin specific functionality (Masternodes, PrivateSend, InstantSend, Governance) (0-1, default: 0) |
||
| + | |||
| + | Masternode options: |
||
| + | -masternode=<n> Enable the client to act as a masternode (0-1, default: 0) |
||
| + | -mnconf=<file> Specify masternode configuration file (default: masternode.conf) |
||
| + | -mnconflock=<n> Lock masternodes from masternode configuration file (default: 1) |
||
| + | -masternodeprivkey=<n> Set the masternode private key |
||
| + | |||
| + | PrivateSend options: |
||
| + | -enableprivatesend=<n> Enable use of automated PrivateSend for funds stored in this wallet (0-1, default: 0) |
||
| + | -privatesendmultisession=<n> Enable multiple PrivateSend mixing sessions per block, experimental (0-1, default: 0) |
||
| + | -privatesendrounds=<n> Use N separate masternodes for each denominated input to mix funds (2-16, default: 2) |
||
| + | -privatesendamount=<n> Keep N TRC anonymized (default: 1000) |
||
| + | -liquidityprovider=<n> Provide liquidity to PrivateSend by infrequently mixing coins on a continual basis (0-100, default: 0, 1=very frequent, high fees, 100=very infrequent, low fees) |
||
| + | |||
| + | InstantSend options: |
||
| + | -enableinstantsend=<n> Enable InstantSend, show confirmations for locked transactions (0-1, default: 1) |
||
| + | -instantsenddepth=<n> Show N confirmations for a successfully locked transaction (0-9999, default: 5) |
||
| + | -instantsendnotify=<cmd> Execute command when a wallet InstantSend transaction is successfully locked (%s in cmd is replaced by TxID) |
||
| + | |||
| + | Node relay options: |
||
| + | -bytespersigop Minimum bytes per sigop in transactions we relay and mine (default: 20) |
||
| + | -datacarrier Relay and mine data carrier transactions (default: 1) |
||
| + | -datacarriersize Maximum size of data in data carrier transactions we relay and mine (default: 83) |
||
| + | -mempoolreplacement Enable transaction replacement in the memory pool (default: 0) |
||
| + | |||
| + | Block creation options: |
||
| + | -blockminsize=<n> Set minimum block size in bytes (default: 0) |
||
| + | -blockmaxsize=<n> Set maximum block size in bytes (default: 750000) |
||
| + | -blockprioritysize=<n> Set maximum size of high-priority/low-fee transactions in bytes (default: 10000) |
||
| + | |||
| + | RPC server options: |
||
| + | -server Accept command line and JSON-RPC commands |
||
| + | -rest Accept public REST requests (default: 0) |
||
| + | -rpcbind=<addr> Bind to given address to listen for JSON-RPC connections. Use [host]:port notation for IPv6. This option can be specified multiple times (default: bind to all interfaces) |
||
| + | -rpccookiefile=<loc> Location of the auth cookie (default: data dir) |
||
| + | -rpcuser=<user> Username for JSON-RPC connections |
||
| + | -rpcpassword=<pw> Password for JSON-RPC connections |
||
| + | -rpcauth=<userpw> Username and hashed password for JSON-RPC connections. The field <userpw> comes in the format: <USERNAME>:<SALT>$<HASH>. A canonical python script is included in share/rpcuser. This option can be specified multiple times |
||
| + | -rpcport=<port> Listen for JSON-RPC connections on <port> (default: 9998 or testnet: 19998) |
||
| + | -rpcallowip=<ip> Allow JSON-RPC connections from specified source. Valid for <ip> are a single IP (e.g. 1.2.3.4), a network/netmask (e.g. 1.2.3.4/255.255.255.0) or a network/CIDR (e.g. 1.2.3.4/24). This option can be specified multiple times |
||
| + | -rpcthreads=<n> Set the number of threads to service RPC calls (default: 4) |
||
| + | |||
| + | ====terracoin-qt==== |
||
| + | |||
| + | Terracoin Core QT GUI, use same command line options as terracoind with additional options for UI as described below. |
||
| + | |||
| + | =====Terracoin Core===== |
||
| + | |||
| + | Usage: |
||
| + | terracoin-qt [command-line options] |
||
| + | |||
| + | Wallet options: |
||
| + | -windowtitle=<name> Wallet window title |
||
| + | |||
| + | Debugging/Testing options: |
||
| + | -debug=<category> Output debugging information (default: 0, supplying <category> is optional). If <category> is not supplied or if <category> = 1, output all debugging information.<category> can be: addrman, alert, bench, coindb, db, http, libevent, lock, mempool, mempoolrej, net, proxy, prune, rand, reindex, rpc, selectcoins, tor, zmq, terracoin (or specifically: gobject, instantsend, keepass, masternode, mnpayments, mnsync, privatesend, spork), qt. |
||
| + | |||
| + | UI options: |
||
| + | -choosedatadir Choose data directory on startup (default: 0) |
||
| + | -lang=<lang> Set language, for example "de_DE" (default: system locale) |
||
| + | -min Start minimized |
||
| + | -rootcertificates=<file> Set SSL root certificates for payment request (default: -system-) |
||
| + | -splash Show splash screen on startup (default: 1) |
||
| + | -resetguisettings Reset all settings changed in the GUI |
||
| + | |||
| + | ====terracoin-cli==== |
||
| + | |||
| + | =====Terracoin Core RPC client===== |
||
| + | |||
| + | Usage: |
||
| + | terracoin-cli [options] <command> [params] Send command to Terracoin Core |
||
| + | terracoin-cli [options] help List commands |
||
| + | terracoin-cli [options] help <command> Get help for a command |
||
| + | |||
| + | Options: |
||
| + | -? This help message |
||
| + | -conf=<file> Specify configuration file (default: terracoin.conf) |
||
| + | -datadir=<dir> Specify data directory |
||
| + | |||
| + | Chain selection options: |
||
| + | -testnet Use the test chain |
||
| + | -regtest Enter regression test mode, which uses a special chain in which blocks can be solved instantly. This is intended for regression testing tools and app development. |
||
| + | -rpcconnect=<ip> Send commands to node running on <ip> (default: 127.0.0.1) |
||
| + | -rpcport=<port> Connect to JSON-RPC on <port> (default: 9998 or testnet: 19998) |
||
| + | -rpcwait Wait for RPC server to start |
||
| + | -rpcuser=<user> Username for JSON-RPC connections |
||
| + | -rpcpassword=<pw> Password for JSON-RPC connections |
||
| + | -rpcclienttimeout=<n> Timeout during HTTP requests (default: 900) |
||
| + | |||
| + | ====terracoin-tx==== |
||
| + | |||
| + | =====Terracoin Core terracoin-tx utility===== |
||
| + | |||
| + | Usage: |
||
| + | terracoin-tx [options] <hex-tx> [commands] Update hex-encoded terracoin transaction |
||
| + | terracoin-tx [options] -create [commands] Create hex-encoded terracoin transaction |
||
| + | |||
| + | Options: |
||
| + | -? This help message |
||
| + | -create Create new, empty TX. |
||
| + | -json Select JSON output |
||
| + | -txid Output only the hex-encoded transaction id of the resultant transaction. |
||
| + | |||
| + | Chain selection options: |
||
| + | -testnet Use the test chain |
||
| + | -regtest Enter regression test mode, which uses a special chain in which blocks can be solved instantly. This is intended for regression testing tools and app development. |
||
| + | |||
| + | Commands: |
||
| + | delin=N Delete input N from TX |
||
| + | delout=N Delete output N from TX |
||
| + | in=TXID:VOUT Add input to TX |
||
| + | locktime=N Set TX lock time to N |
||
| + | nversion=N Set TX version to N |
||
| + | outaddr=VALUE:ADDRESS Add address-based output to TX |
||
| + | outdata=[VALUE:]DATA Add data-based output to TX |
||
| + | outscript=VALUE:SCRIPT Add raw script output to TX |
||
| + | sign=SIGHASH-FLAGS Add zero or more signatures to transaction. This command requires JSON registers:prevtxs=JSON object, privatekeys=JSON object. See signrawtransaction docs for format of sighash flags, JSON objects. |
||
| + | |||
| + | Register Commands: |
||
| + | load=NAME:FILENAME Load JSON file FILENAME into register NAME |
||
| + | set=NAME:JSON-STRING Set register NAME to given JSON-STRING |
||
===RPC commands=== |
===RPC commands=== |
||
| + | This documentation lists all available RPC commands as of Terracoin version 0.12.2.1, and limited documentation on what each command does. For full documentation of arguments, results and examples, type help ( "command" ) to view full details at the console. You can enter commands either from Tools > Debug console in the QT wallet, or using terracoin-cli for headless wallets and terracoind. |
||
| − | ===Anti Virus Issues=== |
||
| + | |||
| + | ====Addressindex==== |
||
| + | |||
| + | getaddressbalance Returns the balance for an address(es) (requires addressindex to be enabled). |
||
| + | getaddressdeltas Returns all changes for an address (requires addressindex to be enabled). |
||
| + | getaddressmempool Returns all mempool deltas for an address (requires addressindex to be enabled). |
||
| + | getaddresstxids Returns the txids for an address(es) (requires addressindex to be enabled). |
||
| + | getaddressutxos Returns all unspent outputs for an address (requires addressindex to be enabled). |
||
| + | |||
| + | ====Blockchain==== |
||
| + | |||
| + | getbestblockhash Returns the hash of the best (tip) block in the longest block chain. |
||
| + | getblock "hash" ( verbose ) If verbose is false, returns a string that is serialized, hex-encoded data for block 'hash'. If verbose is true, returns an Object with information about block <hash>. |
||
| + | getblockchaininfo Returns an object containing various state info regarding block chain processing. |
||
| + | getblockcount Returns the number of blocks in the longest block chain. |
||
| + | getblockhash index Returns hash of block in best-block-chain at index provided. |
||
| + | getblockhashes timestamp Returns array of hashes of blocks within the timestamp range provided. |
||
| + | getblockheader "hash" ( verbose ) If verbose is false, returns a string that is serialized, hex-encoded data for blockheader 'hash'. If verbose is true, returns an Object with information about blockheader <hash>. |
||
| + | getblockheaders "hash" ( count verbose ) Returns an array of items with information about <count> blockheaders starting from <hash>. If verbose is false, each item is a string that is serialized, hex-encoded data for a single blockheader. If verbose is true, each item is an Object with information about a single blockheader. |
||
| + | getchaintips ( count branchlen ) Return information about all known tips in the block tree, including the main chain as well as orphaned branches. |
||
| + | getdifficulty Returns the proof-of-work difficulty as a multiple of the minimum difficulty. |
||
| + | getmempoolinfo Returns details on the active state of the TX memory pool. |
||
| + | getrawmempool ( verbose ) Returns all transaction ids in memory pool as a json array of string transaction ids. |
||
| + | getspentinfo Returns the txid and index where an output is spent. |
||
| + | gettxout "txid" n ( includemempool ) Returns details about an unspent transaction output. |
||
| + | gettxoutproof ["txid",...] ( blockhash ) Returns a hex-encoded proof that "txid" was included in a block. |
||
| + | gettxoutsetinfo Returns statistics about the unspent transaction output set. Note this call may take some time. |
||
| + | verifychain ( checklevel numblocks ) Verifies blockchain database. |
||
| + | verifytxoutproof "proof" Verifies that a proof points to a transaction in a block, returning the transaction it commits to nd throwing an RPC error if the block is not in our best chain. |
||
| + | |||
| + | ====Control==== |
||
| + | |||
| + | debug ( 0|1|addrman|alert|bench|coindb|db|lock|rand|rpc|selectcoins|mempool|mempoolrej|net|proxy|prune|http|libevent|tor|zmq|terracoin|privatesend|instantsend|masternode|spork|keepass|mnpayments|gobject ) |
||
| + | Change debug category on the fly. Specify single category or use comma to specify many. |
||
| + | getinfo Returns an object containing various state info. |
||
| + | help ( "command" ) List all commands, or get help for a specified command. |
||
| + | stop Stop Terracoin Core server. |
||
| + | |||
| + | ====Terracoin==== |
||
| + | |||
| + | getgovernanceinfo Returns an object containing governance parameters. |
||
| + | getpoolinfo Returns an object containing mixing pool related information. |
||
| + | getsuperblockbudget index Returns the absolute maximum sum of superblock payments allowed. |
||
| + | gobject "command"... Manage governance objects. Available commands: |
||
| + | check - Validate governance object data (proposal only) |
||
| + | prepare - Prepare governance object by signing and creating tx |
||
| + | submit - Submit governance object to network |
||
| + | deserialize - Deserialize governance object from hex string to JSON |
||
| + | count - Count governance objects and votes |
||
| + | get - Get governance object by hash |
||
| + | getvotes - Get all votes for a governance object hash (including old votes) |
||
| + | getcurrentvotes - Get only current (tallying) votes for a governance object hash (does not include old votes) |
||
| + | list - List governance objects (can be filtered by signal and/or object type) |
||
| + | diff - List differences since last diff |
||
| + | vote-alias - Vote on a governance object by masternode alias (using masternode.conf setup) |
||
| + | vote-conf - Vote on a governance object by masternode configured in terracoin.conf |
||
| + | vote-many - Vote on a governance object by all masternodes (using masternode.conf setup) |
||
| + | masternode "command"... Set of commands to execute masternode related actions. Available commands: |
||
| + | count - Print number of all known masternodes (optional: 'ps', 'enabled', 'all', 'qualify') |
||
| + | current - Print info on current masternode winner to be paid the next block (calculated locally) |
||
| + | genkey - Generate new masternodeprivkey |
||
| + | outputs - Print masternode compatible outputs |
||
| + | start-alias - Start single remote masternode by assigned alias configured in masternode.conf |
||
| + | start-<mode> - Start remote masternodes configured in masternode.conf (<mode>: 'all', 'missing', 'disabled') |
||
| + | status - Print masternode status information |
||
| + | list - Print list of all known masternodes (see masternodelist for more info) |
||
| + | list-conf - Print masternode.conf in JSON format |
||
| + | winner - Print info on next masternode winner to vote for |
||
| + | winners - Print list of masternode winners |
||
| + | masternodebroadcast "command"... Set of commands to create and relay masternode broadcast messages. Available commands: |
||
| + | create-alias - Create single remote masternode broadcast message by assigned alias configured in masternode.conf |
||
| + | create-all - Create remote masternode broadcast messages for all masternodes configured in masternode.conf |
||
| + | decode - Decode masternode broadcast message |
||
| + | relay - Relay masternode broadcast message to the network |
||
| + | masternodelist ( "mode" "filter" ) Get a list of masternodes in different modes |
||
| + | mnsync [status|next|reset] Returns the sync status, updates to the next step or resets it entirely. |
||
| + | privatesend "command" Available commands: |
||
| + | start - Start mixing |
||
| + | stop - Stop mixing |
||
| + | reset - Reset mixing |
||
| + | sentinelping version Sentinel ping. |
||
| + | spork <name> [<value>] <name> is the corresponding spork name, or 'show' to show all current spork settings, active to show which sporks are active<value> is a epoch datetime to enable or disable spork. Requires wallet passphrase to be set with walletpassphrase call. |
||
| + | voteraw <masternode-tx-hash> <masternode-tx-index> <governance-hash> <vote-signal> [yes|no|abstain] <time> <vote-sig> |
||
| + | Compile and relay a governance vote with provided external signature instead of signing vote internally. |
||
| + | |||
| + | ====Generating==== |
||
| + | |||
| + | generate numblocks Mine blocks immediately (before the RPC call returns). |
||
| + | getgenerate Return if the server is set to generate coins or not. The default is false. It is set with the command line argument -gen (or terracoin.conf setting gen). It can also be set with the setgenerate call. |
||
| + | setgenerate generate ( genproclimit ) Set 'generate' true or false to turn generation on or off. Generation is limited to 'genproclimit' processors, -1 is unlimited. See the getgenerate call for the current setting. |
||
| + | |||
| + | ====Mining==== |
||
| + | |||
| + | getblocktemplate ( "jsonrequestobject" ) If the request parameters include a 'mode' key, that is used to explicitly select between the default 'template' request or a 'proposal'. It returns data needed to construct a block to work on. |
||
| + | getmininginfo Returns a json object containing mining-related information. |
||
| + | getnetworkhashps ( blocks height ) Returns the estimated network hashes per second based on the last n blocks. Pass in [blocks] to override # of blocks, -1 specifies since last difficulty change. Pass in [height] to estimate the network speed at the time when a certain block was found. |
||
| + | prioritisetransaction <txid> <priority delta> <fee delta> |
||
| + | Accepts the transaction into mined blocks at a higher (or lower) priority. |
||
| + | submitblock "hexdata" ( "jsonparametersobject" ) |
||
| + | Attempts to submit new block to network. The 'jsonparametersobject' parameter is currently ignored. See https://en.bitcoin.it/wiki/BIP_0022 for full specification. |
||
| + | |||
| + | ====Network==== |
||
| + | |||
| + | addnode "node" "add|remove|onetry" Attempts add or remove a node from the addnode list. Or try a connection to a node once. |
||
| + | clearbanned Clear all banned IPs. |
||
| + | disconnectnode "node" Immediately disconnects from the specified node. |
||
| + | getaddednodeinfo dummy ( "node" ) Returns information about the given added node, or all added nodes (note that onetry addnodes are not listed here). |
||
| + | getconnectioncount Returns the number of connections to other nodes. |
||
| + | getnettotals Returns information about network traffic, including bytes in, bytes out, and current time. |
||
| + | getnetworkinfo Returns an object containing various state info regarding P2P networking. |
||
| + | getpeerinfo Returns data about each connected network node as a json array of objects. |
||
| + | listbanned List all banned IPs/Subnets. |
||
| + | ping Requests that a ping be sent to all other nodes, to measure ping time. Results provided in getpeerinfo, pingtime and pingwait fields are decimal seconds. Ping command is handled in queue with all other commands, so it measures processing backlog, not just network ping. |
||
| + | setban "ip(/netmask)" "add|remove" (bantime) (absolute) |
||
| + | Attempts add or remove a IP/Subnet from the banned list. |
||
| + | setnetworkactive true|false Disable/enable all p2p network activity. |
||
| + | |||
| + | ====Rawtransactions==== |
||
| + | |||
| + | createrawtransaction [{"txid":"id","vout":n},...] {"address":amount,"data":"hex",...} ( locktime ) |
||
| + | Create a transaction spending the given inputs and creating new outputs. Outputs can be addresses or data. Returns hex-encoded raw transaction. Note that the transaction's inputs are not signed, and it is not stored in the wallet or transmitted to the network. |
||
| + | decoderawtransaction "hexstring" Return a JSON object representing the serialized, hex-encoded transaction. |
||
| + | decodescript "hex" Decode a hex-encoded script. |
||
| + | fundrawtransaction "hexstring" includeWatching |
||
| + | Add inputs to a transaction until it has enough in value to meet its out value. This will not modify existing inputs, and will add one change output to the outputs. |
||
| + | getrawtransaction "txid" ( verbose ) Return the raw transaction data. If verbose=0, returns a string that is serialized, hex-encoded data for 'txid'. If verbose is non-zero, returns an Object with information about 'txid'. |
||
| + | sendrawtransaction "hexstring" ( allowhighfees instantsend ) |
||
| + | Submits raw transaction (serialized, hex-encoded) to local node and network. Also see createrawtransaction and signrawtransaction calls. |
||
| + | signrawtransaction "hexstring" ( [{"txid":"id","vout":n,"scriptPubKey":"hex","redeemScript":"hex"},...] ["privatekey1",...] sighashtype ) |
||
| + | Sign inputs for raw transaction (serialized, hex-encoded). The second optional argument (may be null) is an array of previous transaction outputs that this transaction depends on but may not yet be in the block chain. The third optional argument (may be null) is an array of base58-encoded private keys that, if given, will be the only keys used to sign the transaction. |
||
| + | |||
| + | ====Util==== |
||
| + | |||
| + | createmultisig nrequired ["key",...] Creates a multi-signature address with n signature of m keys required. It returns a json object with the address and redeemScript. |
||
| + | estimatefee nblocks Estimates the approximate fee per kilobyte needed for a transaction to begin confirmation within nblocks blocks. |
||
| + | estimatepriority nblocks Estimates the approximate priority a zero-fee transaction needs to begin confirmation within nblocks blocks. |
||
| + | estimatesmartfee nblocks WARNING: This interface is unstable and may disappear or change! Estimates the approximate fee per kilobyte needed for a transaction to begin confirmation within nblocks blocks if possible and return the number of blocks for which the estimate is valid. |
||
| + | estimatesmartpriority nblocks WARNING: This interface is unstable and may disappear or change! Estimates the approximate priority a zero-fee transaction needs to begin confirmation within nblocks blocks if possible and return the number of blocks for which the estimate is valid. |
||
| + | validateaddress "terracoinaddress" Return information about the given terracoin address. |
||
| + | verifymessage "terracoinaddress" "signature" "message" |
||
| + | Verify a signed message. |
||
| + | |||
| + | ====Wallet==== |
||
| + | |||
| + | abandontransaction "txid" Mark in-wallet transaction <txid> as abandoned. This will mark this transaction and all its in-wallet descendants as abandoned which will allow for their inputs to be respent. |
||
| + | addmultisigaddress nrequired ["key",...] ( "account" ) |
||
| + | Add a nrequired-to-sign multisignature address to the wallet. Each key is a Terracoin address or hex-encoded public key. If 'account' is specified (DEPRECATED), assign address to that account. |
||
| + | backupwallet "destination" Safely copies wallet.dat to destination, which can be a directory or a path with filename. |
||
| + | dumphdinfo Returns an object containing sensitive private info about this HD wallet. |
||
| + | dumpprivkey "terracoinaddress" Reveals the private key corresponding to 'terracoinaddress'. Then the importprivkey can be used with this output |
||
| + | dumpwallet "filename" Dumps all wallet keys in a human-readable format. |
||
| + | encryptwallet "passphrase" Encrypts the wallet with 'passphrase'. This is for first time encryption. After this, any calls that interact with private keys such as sending or signing will require the passphrase to be set prior the making these calls. Use the walletpassphrase call for this, and then walletlock call. If the wallet is already encrypted, use the walletpassphrasechange call. Note that this will shutdown the server. |
||
| + | getaccount "terracoinaddress" DEPRECATED. Returns the account associated with the given address. |
||
| + | getaccountaddress "account" DEPRECATED. Returns the current Terracoin address for receiving payments to this account. |
||
| + | getaddressesbyaccount "account" DEPRECATED. Returns the list of addresses for the given account. |
||
| + | getbalance ( "account" minconf addlockconf includeWatchonly ) |
||
| + | If account is not specified, returns the server's total available balance. If account is specified (DEPRECATED), returns the balance in the account. Note that the account "" is not the same as leaving the parameter out. The server total may be different to the balance in the default "" account. |
||
| + | getnewaddress ( "account" ) Returns a new Terracoin address for receiving payments. If 'account' is specified (DEPRECATED), it is added to the address book so payments received with the address will be credited to 'account'. |
||
| + | getrawchangeaddress Returns a new Terracoin address, for receiving change. This is for use with raw transactions, NOT normal use. |
||
| + | getreceivedbyaccount "account" ( minconf addlockconf ) |
||
| + | DEPRECATED. Returns the total amount received by addresses with <account> in transactions with specified minimum number of confirmations. |
||
| + | getreceivedbyaddress "terracoinaddress" ( minconf addlockconf ) |
||
| + | Returns the total amount received by the given terracoinaddress in transactions with specified minimum number of confirmations. |
||
| + | gettransaction "txid" ( includeWatchonly ) Get detailed information about in-wallet transaction <txid> |
||
| + | getunconfirmedbalance Returns the server's total unconfirmed balance. |
||
| + | getwalletinfo Returns an object containing various wallet state info. |
||
| + | importaddress "address" ( "label" rescan p2sh ) |
||
| + | Adds a script (in hex) or address that can be watched as if it were in your wallet but cannot be used to spend. |
||
| + | importelectrumwallet "filename" index Imports keys from an Electrum wallet export file (.csv or .json) |
||
| + | importprivkey "terracoinprivkey" ( "label" rescan ) |
||
| + | Adds a private key (as returned by dumpprivkey) to your wallet. |
||
| + | importpubkey "pubkey" ( "label" rescan ) Adds a public key (in hex) that can be watched as if it were in your wallet but cannot be used to spend. |
||
| + | importwallet "filename" Imports keys from a wallet dump file (see dumpwallet). |
||
| + | instantsendtoaddress "terracoinaddress" amount ( "comment" "comment-to" subtractfeefromamount ) |
||
| + | Send an amount to a given address. The amount is a real and is rounded to the nearest 0.00000001 |
||
| + | keepass <genkey|init|setpassphrase> |
||
| + | keypoolrefill ( newsize ) Fills the keypool. |
||
| + | listaccounts ( minconf addlockconf includeWatchonly) |
||
| + | DEPRECATED. Returns Object that has account names as keys, account balances as values. |
||
| + | listaddressgroupings Lists groups of addresses which have had their common ownership made public by common use as inputs or as the resulting change in past transactions. |
||
| + | listlockunspent Returns list of temporarily unspendable outputs. See the lockunspent call to lock and unlock transactions for spending. |
||
| + | listreceivedbyaccount ( minconf addlockconf includeempty includeWatchonly) |
||
| + | DEPRECATED. List balances by account. |
||
| + | listreceivedbyaddress ( minconf addlockconf includeempty includeWatchonly) |
||
| + | List balances by receiving address. |
||
| + | listsinceblock ( "blockhash" target-confirmations includeWatchonly) |
||
| + | Get all transactions in blocks since block [blockhash], or all transactions if omitted |
||
| + | listtransactions ( "account" count from includeWatchonly) |
||
| + | Returns up to 'count' most recent transactions skipping the first 'from' transactions for account 'account'. |
||
| + | listunspent ( minconf maxconf ["address",...] ) |
||
| + | Returns array of unspent transaction outputs with between minconf and maxconf (inclusive) confirmations. Optionally filter to only include txouts paid to specified addresses. |
||
| + | lockunspent unlock [{"txid":"txid","vout":n},...] |
||
| + | Updates list of temporarily unspendable outputs. Temporarily lock (unlock=false) or unlock (unlock=true) specified transaction outputs. |
||
| + | move "fromaccount" "toaccount" amount ( minconf "comment" ) |
||
| + | DEPRECATED. Move a specified amount from one account in your wallet to another. |
||
| + | sendfrom "fromaccount" "toterracoinaddress" amount ( minconf addlockconf "comment" "comment-to" ) |
||
| + | DEPRECATED (use sendtoaddress). Sent an amount from an account to a terracoin address. |
||
| + | sendmany "fromaccount" {"address":amount,...} ( minconf addlockconf "comment" ["address",...] subtractfeefromamount use_is use_ps ) |
||
| + | Send multiple times. Amounts are double-precision floating point numbers. |
||
| + | sendtoaddress "terracoinaddress" amount ( "comment" "comment-to" subtractfeefromamount use_is use_ps ) |
||
| + | Send an amount to a given address. |
||
| + | setaccount "terracoinaddress" "account" DEPRECATED. Sets the account associated with the given address. |
||
| + | settxfee amount Set the transaction fee per kB. Overwrites the paytxfee parameter. |
||
| + | signmessage "terracoinaddress" "message" Sign a message with the private key of an address. |
||
| + | walletlock Removes the wallet encryption key from memory, locking the wallet. After calling this method, you will need to call walletpassphrase again before being able to call any methods which require the wallet to be unlocked. |
||
| + | walletpassphrase "passphrase" timeout ( mixingonly ) |
||
| + | Stores the wallet decryption key in memory for 'timeout' seconds. This is needed prior to performing transactions related to private keys such as sending terracoins |
||
| + | walletpassphrasechange "oldpassphrase" "newpassphrase" |
||
| + | Changes the wallet passphrase from 'oldpassphrase' to 'newpassphrase'. |
||
===Running Terracoin=== |
===Running Terracoin=== |
||
| + | |||
| + | ====Terracoin.conf Configuration File==== |
||
| + | |||
| + | All command-line options (except for -datadir and -conf) may be specified in a configuration file, and all configuration file options may also be specified on the command line. Command-line options override values set in the configuration file. |
||
| + | |||
| + | Commands: |
||
| + | |||
| + | terracoind -help |
||
| + | |||
| + | terracoind_-help.txt |
||
| + | |||
| + | terracoin-cli -help |
||
| + | |||
| + | terracoin-cli_-help.txt |
||
| + | |||
| + | terracoin-tx -help |
||
| + | |||
| + | terracoin-tx_-help.txt |
||
| + | |||
| + | terracoin-qt -help |
||
| + | |||
| + | terracoin-qt_-help.txt |
||
| + | |||
| + | The configuration file is a list of setting=value pairs, one per line, with optional comments starting with the '#' character. |
||
| + | |||
| + | The configuration file is not automatically created; you can create it using your favorite plain-text editor. By default, Terracoin-Qt (or terracoind) will look for a file named 'terracoin.conf' in the terracoin data directory, but both the data directory and the configuration file path may be changed using the -datadir and -conf command-line arguments. |
||
| + | |||
| + | Windows |
||
| + | |||
| + | %APPDATA%\TerracoinCore\ |
||
| + | |||
| + | (XP) C:\Documents and Settings\username\Application Data\TerracoinCore\terracoin.conf |
||
| + | |||
| + | (Vista, 7,8,8.1,10) C:\Users\username\AppData\Roaming\TerracoinCore\terracoin.conf |
||
| + | |||
| + | Linux |
||
| + | |||
| + | $HOME/.terracoincore/ |
||
| + | |||
| + | /home/username/.terracoincore/terracoin.conf |
||
| + | |||
| + | Mac |
||
| + | |||
| + | OSX |
||
| + | |||
| + | $HOME/Library/Application Support/TerracoinCore/ |
||
| + | |||
| + | /Users/username/Library/Application Support/TerracoinCore/terracoin.conf |
||
| + | |||
| + | Note: if running Terracoin in testnet mode, the sub-folder "testnet3" will be appended to the data directory automatically. |
||
Latest revision as of 16:05, 9 August 2018
Contents
- 1 Terracoin Core Wallet
- 2 Introduction to Terracoin Core
- 2.1 Installation
- 2.2 The Main Window
- 2.3 Terracoin Core Options
- 2.3.1 Main
- 2.3.2 Wallet
- 2.3.2.1 Enable coin control features
- 2.3.2.2 Show Masternodes tab
- 2.3.2.3 Enable advanced PrivateSend interface
- 2.3.2.4 Warn if PrivateSend is running out of keys
- 2.3.2.5 Enable PrivateSend multi-session
- 2.3.2.6 Spend unconfirmed change
- 2.3.2.7 PrivateSend rounds to use
- 2.3.2.8 Amount of Terracoin to keep anonymized
- 2.3.3 Network tab
- 2.3.4 Window tab
- 2.3.5 Display tab
- 2.4 Terracoin Core Tools
- 2.5 Salvage wallet
- 2.6 Rescan blockchain files
- 2.7 Recover transactions
- 2.8 Upgrade wallet format
- 2.9 Rebuild index
- 3 How to send and receive Terracoin
- 4 Transactions
- 5 How to use PrivateSend
- 6 How to safely back up your wallet
- 7 Guides for advanced functions
Terracoin Core Wallet
Whenever you are storing objects with a market value, security is necessary. This applies to barter systems as well as economies using currency as a medium of exchange. While banks store balances on a private ledger, cryptocurrencies store balances under unique addresses on a distributed public ledger. The cryptographic private keys to access the balance stored on each public address are therefore the object of value in this system. This section of the documentation discusses different practical methods of keeping these keys safe in wallets, while still remaining useful for day-to-day needs.
The Terracoin Core Wallet is the full official release supporting all Terracoin features as they are released, including InstantSend and PrivateSend, as well as the governance, masternode and voting features. It is identical to the software used by the Terracoin masternodes, and as such, it requires you to download the entire Terracoin blockchain. It is available for macOS, Linux, and Windows.
Wallet Releases
The newest wallet releases can always be found here: https://github.com/terracoin/terracoin/releases
Introduction to Terracoin Core
This documentation describes the Terracoin Core Wallet and how to use its basic functions. Since the functionality is similar across all supported platforms (Windows, macOS, Linux), the instructions and screenshots will reference the Windows software, highlighting differences between the platforms where necessary. See here for separate installation guides specific to each platform.
The Terracoin Core Wallet (sometimes known as the QT wallet, due to the QT software framework used in development) is a professional or heavy wallet which downloads the full blockchain (several GB in size), operates as a full node on the network and offers all functions available to Terracoin. When the wallet starts up, some time is required for it to synchronise its copy of the blockchain with the network. Once this is done, the correct balances will be displayed and the functions in the wallet can be used.
Features:
- PrivateSend
- InstandSend
- Wallet encryption
- Coin control and fee control
- QR code generation and address book
- Masternode commands and voting
- Automated backup
- Debug console
Installation
Terracoin Core can be compiled from source or downloaded for Linux, macOS and Windows here. Full installation guides are available here.
The Main Window
The Terracoin Core Wallet is an application that runs on your computer and allows you to make transactions on the Terracoin network. Most transactions are for sending or receiving Terracoin, but it is also possible to create signed messages or control a masternode, for example.
The Terracoin Core window is broken up into several areas:
- The menu bar
- The tab bar
- The main area
- The status bar
Terracoin Core Main Window
The Menu Bar
The menu bar provides access to all functions of Terracoin Core. There are four menus available:
- File: The File menu is used to manage your wallet, messages and addresses.
- Settings: The Settings menu provides access to wallet encryption options and general software settings.
- Tools: The Tools menu provides information on the network, allows you modify masternode configuration files and other advanced functions.
- Help: The Help menu links to documentation, guides and legal statements relating to Terracoin Core.
The Tab Bar
The tab bar is used to quickly switch between the main areas of the Terracoin Core. The content in the main area of Terracoin Core changes depending on which tab you have selected. The following tabs are available:
The Overview tab
The overview tab offers quick access to your balance and most recent transactions, as well as the PrivateSend feature and options for coin mixing.
Terracoin Core Overview Tab
The left part of the main area is divided into two areas. The upper area shows your balances:
- Available: This shows your current liquid balance. This is the amount of Terracoin you can spend now.
- Pending: This shows funds waiting for a transaction to complete.
- Immature: This shows funds from masternode or mining payments which have not yet reached the required number of confirmations.
- Total: This is simply your available and pending funds added together.
The lower area shows the status of PrivateSend and allows you to mix your funds using the Terracoin Masternode Network.
The right part of the screen shows your recent transactions. These are identified by icons as follows:
Recent incoming transactions appear black, prefixed by a + sign
Recent outgoing transactions appear red, prefixed by a – sign
Incoming mining or masternode payments also appear black
For more details on your transaction history, see the Transactions tab.
The Send Tab
The Send tab allows you to send funds to another address on the Terracoin network. It contains fields to enter the recipient’s address, a label for the address, and the amount of Terracoin you wish to send. Options related to the transaction fee, InstantSend and PrivateSend are also available. A quick view of your total balance is also available in the lower right corner.
Terracoin Core Send Tab
The Receive Tab
The Receive tab allows you to create addresses to receive Terracoin. You can create a request for a specific amount of Terracoin or include a specific message, and send it to another user as a link or QR code.
Terracoin Core Receive Tab
The Transactions Tab
The transactions tab shows the entire transaction history for all addresses associated with your wallet. This appears as a table showing the time, type, label and amount of Terracoin for each transaction. You can also export the transaction history as a CSV file by clicking the Export button in the bottom right corner of the window.
The icons in the leftmost column indicate the status of the transaction. A tick indicates that the recommended number of confirmations has been passed, while a clock indicates that the transaction has yet to reach six confirmations.
Terracoin Core Transactions Tab
The Status Bar
The status bar shows a synchronization progress bar and a row of status icons which indicate the status of your connection to the Terracoin network.
The Synchronization Area
This bar shows the synchronization status of Terracoin Core with the Terracoin network. Each time you open Terracoin Core, it will begin downloading the blocks which have been created on the blockchain in the time since you last opened the app. These blocks are downloaded from other Terracoin users and masternodes. If you have never opened the app before, this could mean several years' worth of blocks need downloading. The following statuses are possible:
- No block source available: This occurs if your internet connection is down, or if the ports required by Terracoin Core are blocked by a firewall.
- Synchronizing with network: Terracoin Core is downloading blocks from the network.
- Synchronizing masternodes/masternode payments/governance objects: Terracoin Core is synchronizing other data with the second layer network.
Once synchronization is complete, the progress bar will disappear and a tick will appear on the right of the status bar.
The Status Icons
The lock icons indicate the status of your wallet: either locked or unlocked. You need to unlock your wallet to send funds or perform certain other actions.
These icons indicate the quality of your connection to the Terracoin network. If you cannot connect because of network problems, you will see the icon on the left. More bars indicate more connections to your peers on the network.
These icons show the synchronization status of Terracoin Core with the network. Once synchronization is complete, the refresh icon will become a blue tick.
Terracoin Core Options
This documentation describes the functionality of the Terracoin Core Options dialog, available under the Settings > Options menu in Terracoin Core.
Main
The Main tab of the Options dialog contains settings related to startup and performance of the Terracoin Core app.
The Main tab of the Terracoin Core Options dialog
Start Terracoin Core on system login
This option causes Terracoin Core to start automatically when the current user logs in. On most computers there is only one main user account which is logged in automatically when the computer turns on, so this option is effectively the same as starting Terracoin Core together with the operating system.
Size of database cache
This option specifies the size of the database cache in memory. A higher value will result in increased performance when adding new blocks at the cost of higher memory usage. The default value is 100MB and it should not be set lower than this level.
Number of script verification threads
This option sets the number of script verification threads, ranging from -4 to 16. Script verification is the process of following instructions recorded in the blockchain to ensure the transactions are valid. 0 means automatic and will allow script verification to scale to the number of cores available on your processor. Setting a positive number specifies that Terracoin Core should use that number of processor cores, while setting a negative number will leave that number of processor cores free.
Wallet
The Wallet tab of the Options dialog contains settings related to how addresses are managed in the Terracoin Core app. The first time you run Terracoin Core, it will generate a new wallet containing 1000 unique Terracoin addresses. This tab allows you to configure how these addresses are used as inputs with the Coin Control, PrivateSend and Masternode features.
The Wallet tab of the Terracoin Core Options dialog
Enable coin control features
Your Terracoin Core wallet balance is actually the sum total of all addresses holding balance that are associated with your wallet. When you spend Terracoin, Terracoin Core will withdraw from as many inputs as necessary to make up the desired amount of Terracoin to be transferred. This behavior may be undesirable if you want to keep a certain balance on one address. The most common use case is the requirement to maintain 5000 Terracoin on a single address as collateral for a masternode.
Enabling this option will add a button labelled Inputs on the Send tab. This provides access to the Coin selection dialog, which can be used to lock, unlock and prioritize different addresses in your wallet. See here for a more detailed explanation of Coin Control.
Show Masternodes tab
Enabling this option causes Terracoin Core to display an additional Masternodes tab to the right of the Transactions tab. This option requires you to restart the Terracoin Core app.
The Masternodes tab can be used to manage interactions (start, stop, check status, etc.) with masternodes controlled by this wallet. This tab is an advanced feature not required by users that do not operate a masternode on the Terracoin network. See here for a description of the Masternodes tab.
Enable advanced PrivateSend interface
Enabling this option changes the PrivateSend mixing interface on the Overview tab of the Terracoin Core wallet to include more options, such as Try Mix and percentage completion. See here for a full explanation of how to use PrivateSend.
Warn if PrivateSend is running out of keys
Enabling this option will cause Terracoin Core to display a warning when your original set of 1000 addresses is running out, which may affect PrivateSend mixing. Every time a mixing event happens, up to 9 of your addresses are used up. This means those 1000 addresses last for about 100 mixing events. When 900 of them are used, your wallet must create more addresses. It can only do this, however, if you have automatic backups enabled. Consequently, users who have backups disabled will also have PrivateSend disabled.
Enable PrivateSend multi-session
Normally PrivateSend mixing is completed in several consecutive rounds, each using a single masternode. Enabling this option allows multi-session, which means you can use multiple masternode servers at the same time, greatly increasing the speed of the mixing process at the cost of creating more addresses and thus requiring more frequent wallet backups. This feature is experimental as of Terracoin Core 12.1.7.
Spend unconfirmed change
When this option is enabled, the Terracoin Core wallet permits you to immediately spend change from previous transactions that has been transferred internally between addresses associated with the same wallet. This is possible even if the transaction has not yet been confirmed because the wallet knows it will eventually be confirmed since it created the internal transaction itself. Leaving this option enabled allows you to create new transactions even if previous transactions have not yet been confirmed.
PrivateSend rounds to use
Use this option to control the number of rounds of PrivateSend mixing to be carried out for your chosen balance. Each round of mixing uses a new masternode. The higher the number of rounds, the more difficult it becomes to trace the Terracoin to its original address. This is at the expense of more time required for mixing and potentially higher fees. See here for a full explanation of how to use PrivateSend.
Amount of Terracoin to keep anonymized
This option allows you to specify how much Terracoin should be kept on balance in a ready-to-use anonymized state, meaning it has already passed through the PrivateSend mixing process. If you do not have sufficient Terracoin available in your balance of unlocked inputs, the amount will be automatically reduced to the available balance and shown in red in the PrivateSend interface on the Overview tab.
Network tab
This tab includes options related to how your connection to the Terracoin network is made.
The Network tab of the Terracoin Core Options dialog
Map port using UPnP
This option causes Terracoin Core to automatically attempt to open and map the client port on your router using UPnP (Universal Plug and Play). This feature is supported by most modern home routers and will allow you to connect to the Terracoin network without making any special settings on your router.
Allow incoming connections
This option causes your client to accept external connections. Since Terracoin is a peer-to-peer network and Terracoin Core is considered a full client because it stores a copy of the blockchain on your device, enabling this option helps other clients synchronize the blockchain and network through your node.
Connect through SOCKS5 proxy (default proxy)
These options allow users on an intranet requiring a proxy to reach the broader internet to specify the address of their proxy server to relay requests to the internet. Contact your system administrator or check out the network settings in your web browser if you are unable to connect and suspect a proxy may be the source of the problem.
Use separate SOCKS5 proxy to reach peers via Tor hidden services
These options allow you to specify an additional proxy server designed to help you connect to peers on the Tor network. This is an advanced option for increased privacy and requires a Tor proxy on your network. For more information about Tor, see here.
Window tab
This option contains options governing behavior of the Terracoin Core app window under Microsoft Windows.
The Window tab of the Terracoin Core Options dialog
Hide tray icon
When this option is enabled, Terracoin Core will not display an icon in the system tray. This option cannot be selected at the same time as Minimize to the tray instead of the taskbar.
Minimize to the tray instead of the taskbar
When this option is enabled and the Terracoin Core window is minimized, it will no longer appear in your taskbar as a running task. Instead, Terracoin Core will keep running in the background and can be re-opened from the Terracoin icon in the system tray (the area next to your system clock). This option cannot be selected at the same time as Hide tray icon.
Minimize on close
When this option is enabled, clicking the X button in the top right corner of the window will cause Terracoin Core to minimize rather than close. To completely close the app, select File > Exit.
Display tab
This tab contains options relating to the appearance of the Terracoin Core app window.
The Display tab of the Terracoin Core Options dialog
User interface language
Select your preferred language from this drop-down menu. Changing the language requires you to restart the Terracoin Core app. Terracoin Core currently offers translations in Bulgarian, German, English, Spanish, Finnish, French, Italian, Japanese, Polish, Portuguese (Brazil), Russian, Slovenian, Swedish, Vietnamese, Simplified Chinese and Traditional Chinese.
User interface theme
You can use this option to select a different theme governing the appearance of the Terracoin Core window. All functionality is identical under the different themes, although the default Terracoin-light theme is most recent and most likely to work without any display artifacts.
Unit to show amounts in
This allows you to change the default unit of currency in Terracoin Core from TRC to mTRC, µTRC or duffs. Each unit shifts the decimal separator three places to the right. Duffs are the smallest unit into which Terracoin may be separated.
Decimal digits
This option allows you to select how many decimal digits will be displayed in the user interface. This does not affect internal accounting of your inputs and balance.
Third party transaction URLs
This option allows you to specify and external website to inspect a particular address or transaction on the blockchain. Several blockchain explorers are available for this. To use this feature, enter the URL of your favorite blockchain explorer, replacing the %s with the transaction ID. You will then be able to access this blockchain explorer directly from Terracoin Core using the context menu of any given transaction.
Terracoin Core Tools
This documentation describes the functionality of theTerracoin Core Tools dialog, available under the Tools menu in Terracoin Core.
Information
The Information tab of the Tools dialog contains information related to the software and network.
The Information tab of the Terracoin Core Tools dialog
General
This section displays information on the name and version of the client and database, and the location of the current application data directory.
Network
This section displays information and statistics on the network to which you are connected.
Block chain
This section shows the current status of the blockchain.
Memory pool
This section shows the status of the memory pool, which contains transactions that could not yet be written to a block. This includes both transactions created since the last block and transactions which could not be entered in the last block because it was full.
Open debug log file
This button opens debug.log from the application data directory. This file contains output from Terracoin Core which may help to diagnose errors.
Console
The Console window provides an interface with the Terracoin Core RPC (remote procedure call) console. This is equivalent to the terracoin-cli command on headless versions of Terracoin, such as terracoind running on a masternode. Click the red – icon to clear the console, and see the detailed documentation on RPC commands to learn about the possible commands you can issue.
The Console tab of the Terracoin Core Tools dialog
Network Traffic
The Network Traffic tab shows a graph of traffic sent and received to peers on the network over time. You can adjust the time period using the slider or Clear the graph.
The Network Traffic tab of the Terracoin Core Tools dialog
Peers
The Peers tab shows a list of other full nodes connected to your Terracoin Core client. The IP address, version and ping time are visible. Selecting a peer shows additional information on the data exchanged with that peer.
The Peers tab of the Terracoin Core Tools dialog
Wallet Repair
The Wallet Repair tab offers a range of startup commands to restore a wallet to a functional state. Selecting any of these commands will restart Terracoin Core with the specified command-line option.
The Wallet Repair tab of the Terracoin Core Tools dialog
Salvage wallet
Salvage wallet assumes wallet.dat is corrupted and cannot be read. It makes a copy of wallet.dat to wallet.<date>.bak and scans it to attempt to recover any private keys. Check your debug.log file after running salvage wallet and look for lines beginning with "Salvage" for more information on operations completed.
Rescan blockchain files
Rescans the already downloaded blockchain for any transactions affecting accounts contained in the wallet. This may be necessary if you replace your wallet.dat file with a different wallet or a backup - the wallet logic will not know about these transactions, so a rescan is necessary to determine balances.
Recover transactions
The recover transactions commands can be used to remove unconfirmed transactions from the memory pool. Your wallet will restart and rescan the blockchain, recovering existing transactions and removing unconfirmed transactions. Transactions may become stuck in an unconfirmed state if there is a conflict in protocol versions on the network during PrivateSend mixing, for example, or if a transaction is sent with insufficient fees when blocks are full.
Upgrade wallet format
This command is available for very old wallets where an upgrade to the wallet version is required in addition to an update to the wallet software. You can view your current wallet version by running the getinfo command in the console.
Rebuild index
Discards the current blockchain and chainstate indexes (the database of unspent transaction outputs) and rebuilds it from existing block files. This can be useful to recover missing or stuck balances.
How to send and receive Terracoin
Transactions
Your Terracoin Core Wallet is associated with a number of unique addresses that can be used to send and receive TRC. Each address holds its own balance, and the sum of all your balances is what appears on the Overview tab. When you send Terracoin, your wallet will automatically transfer funds from as many of your addresses as necessary to the destination address, which is controlled by another Terracoin user and associated with their wallet. You can control which addresses you use using the Coin Control feature.
When you confirm a transaction, Terracoin Core will enter the transaction in a block, which will then be added to the blockchain for other clients to confirm. A transaction is generally considered confirmed once six blocks have been added after the block containing your transaction, although masternode and mining payments are only released after 101 blocks. Note that a different process is used for InstantSend and PrivateSend transactions.
Terracoin addresses are 34 characters long and begin with a 1.
Sending Terracoin
You can use Terracoin Core to send Terracoin from your balance to another user. The receiving user will provide you with a Terracoin address to which you should send the funds. Click the Send tab in the tab bar and enter the destination address in the Pay To field.
The Terracoin Core Send tab
You can also use the three icons to the right of the Pay To field to select a previously used address, paste an address from the clipboard, or clear the current address. If this is a new address, you can enter a name for the address in the Label field to help identify it again later. Finally, enter the amount of Terracoin you want to transfer in the Amount field.
The other options relate to fees and PrivateSend/InstantSend. You can choose if you want to pay the network fee in addition to the amount sent, or subtract it from the amount sent. You can also increase your fee to encourage nodes on the network to prioritize your transaction. Choosing InstantSend has a similar effect, but actually relies on a different mechanism in the second layer network to speed up the transaction time. You can read more about InstantSend here. Choosing PrivateSend will send Terracoin from an address that has previously been mixed. You can find out more about PrivateSend and mixing here.
Let’s try an example. Say you have decided to donation 5 TRC to the Terracoin Foundation.
The Send tab filled out for a transaction
Once you have entered the destination address and the amount, click the Send button. If you have encrypted your wallet, you will now be required to enter your password to unlock the wallet.
Entering the password to unlock the wallet
Finally, you are given one final confirmation and chance to cancel your send transaction before Terracoin Core processes the transaction on the blockchain.
Final confirmation window
If you respond with Yes, your transaction will be processed. Your operating system may display a notification, and the transaction will appear on the Transactions tab, where you can monitor its progress.
The Windows 10 sent transaction confirmation notification
Note that the amount of the transaction increased by .00007460 Terracoin. This is the transaction fee. In the next section, we will see what this procedure looks like from the receiving side.
Receiving Terracoin
To receive Terracoin, you must first create a receiving address to give to the sending party. To do this, click File > Receiving addresses. The Receiving addresses window appears.
The Receiving addresses window
Either copy an existing address by clicking on the address and then the Copy button, or create a new address by clicking the New button. You can also edit an existing address by right clicking and selecting Edit address from the context menu. Give this address to the person who will send you Terracoin. Your wallet does not need to be open to receive funds, but if it is, you can watch the transaction arrive in real time. This is because your wallet constantly watches for new blocks on the blockchain when it is open, and will recognize a new transaction involving your receiving address when it occurs.
The Windows 10 received transaction confirmation notification
Once you have been paid, you can see the balance both on the Overview tab and on the Transactions tab.
The received transaction
How to use PrivateSend
Below describes how to use the Terracoin client to run PrivateSend and anonymize your Terracoin. PrivateSend, rebranded from DarkSend in May 2016, is a trustless method of running a sequence of transactions such that an external observer is unable to determine the source of funding when a PrivateSend transaction is created. This gives your Terracoin the same anonymous properties as cash withdrawn from an ATM, for example. By using this software, you agree not to use it for illegal purposes and that you are solely responsible for any lost Terracoin.
Introduction to PrivateSend
With the introduction of Release Candidate 4 (RC4) of the Darkcoin client, it became possible to store pre-mixed, denominated Terracoin in the user’s wallet, to be used instantly at any time the user desires. The mixing and denomination process is seamless, automatic, and requires no intervention on the part of the user. The current implementation of PrivateSend in the Terracoin Core wallet allows any amount of Terracoin to be mixed for later use in PrivateSend transactions.
Here's how it works:
- Every 10 blocks, user clients network-wide will send any unmixed, traceable Terracoin in their possession through an anonymization phase. In this phase, masternodes are used in chained succession to mix the coins they receive from the network and break them down into homogenous denominations.
- After being processed by a minimum of 2 masternodes, the coins are either sent to the next masternode in the chain or back to the user’s wallet at randomly generated change addresses.
- Depending on the desired depth of security and privacy, users may select between 2 and 8 “hops” to successive masternodes before their coins are sent back to the client. Hops are made every 10 blocks, so anonymization at a depth of 2 hops will take 2*2.5=5.0 minutes, 3 hops 3*2.5=7.5 minutes, and so on. The desired mixing depth can be selected in the client GUI.
- At the end of the anonymization phase, the user’s coins are returned to their client at randomly generated change addresses. When the user wishes to make a transaction, the client forwards the intended amount from these anonymous change addresses directly to the intended receiver’s address. There is no direct involvement of of masternodes in the final person-to-person transaction.
- Proof of payment will work as it always has: a user can see the send transaction with the receiver’s address in their own wallet, and the blockchain will show that the receiver’s address received an input in the corresponding amount.
Setting default PrivateSend options
1. Open your Terracoin Core wallet, go to Settings and select Options. Go to the Wallet tab.
Terracoin Options Wallet PrivateSend Advanced
2. Next to PrivateSend rounds to use, enter a value between 1-8.
Each round of PrivateSend performs one denominated fund mixing transaction. Higher numbers of rounds increase your overall level of anonymity while decreasing the chance of detection via node collusion. 8 is the highest number of rounds currently available.
NOTE: each round of PrivateSend includes a masternode fee of 0.0125 Terracoin.
3. Enter a target value for Amount of Terracoin to keep anonymized.
This value provides a lower boundary on the final amount of funds to be anonymized. Depending on how the client splits your wallet balance, you may end up with denominated inputs whose sum total is greater than the target amount. In this case the client will use all existing denominated inputs in the PrivateSend process. The final anonymized amount may be higher than your target, but should be close.
4. Click OK to save settings.
5. PrivateSend is disabled by default when you open the wallet. It will only start after you set the number of rounds and number of Terracoin to mix under settings and click Start Mixing on the Overview tab of your wallet.
Initiating the PrivateSend process
The PrivateSend process is initiated by clicking the Start Mixing button on the Overview tab of the Terracoin Core wallet. Mixing is possible once the following conditions have been met:
The wallet contains sufficient non-anonymized funds to create the minimum required denominated values The user has not disabled PrivateSend in the Options dialog The target value for anonymized Funds in the Options dialog is greater than zero If your wallet is encrypted (highly recommended), you will be asked to enter your wallet passphrase. Enable the Only for mixing via PrivateSend checkbox to unlock the wallet for mixing only.
Entering a password for PrivateSend mixing only
This will unlock your wallet, and the PrivateSend mixing process will begin. The wallet will remain unlocked until PrivateSend mixing is complete, at which point it will be locked automatically.
PrivateSend interface after clicking the Start Mixing button. Note the Status is Enabled.
PrivateSend will begin creating transactions and your PrivateSend balance will gradually increase. This process can take some time, so be patient. You can monitor the process in more detail as described here.
Any of the following actions will interrupt the mixing process. Because the transactions are atomic (they either take place completely, or do not take place at all), it should be possible to safely interrupt PrivateSend mixing at any time.
Clicking the Stop Mixing button on the Overview tab Closing the client before PrivateSend mixing is completed Sending PrivateSend funds from the wallet before PrivateSend rounds are completed Disabling PrivateSend before the process is complete
Monitoring PrivateSend progress
If you want to monitor PrivateSend in more detail, you need to enable some advanced features of the wallet. Go to Settings, select Options and go to the Wallet tab. Check the boxes next to the Enable coin control features and Enable advanced PrivateSend interface options.
Enabling advanced options for PrivateSend in the Terracoin Core wallet settings
This will allow you to monitor progress and see which individual operations PrivateSend is carrying out in the background.
Monitoring PrivateSend progress
This will allow you to monitor progress and see which individual operations PrivateSend is carrying out in the background.
Since PrivateSend mixing creates a lot of new address keys to send and receive the anonymized denominations, you may receive a warning when the number of remaining keys runs low. This is nothing to be worried about, since the wallet will simply create more keys as necessary. However, these keys will not exist in any previous backups of your wallet. For this reason, it is important to backup your wallet again after mixing is complete.
You can also monitor PrivateSend progress by viewing the transactions created by the mixing process on the Transactions tab.
Transactions created by PrivateSend on the Transactions tab
You can also use the coin control feature to view which addresses hold mixed denominations ready to be used for PrivateSend transactions. Go to the Send tab of your wallet and click Inputs to view the possible input addresses for your transactions. You can see how each address holds given denominations of mixed Terracoin, and how many rounds of mixing have been completed. This is to ensure that an efficient combination of addresses can be used as inputs in PrivateSend transactions without too much change, since amount in a PrivateSend transaction must be rounded up to completely spend all inputs. The current minimum balance for an input used in a PrivateSend transaction is 0.01000010 Terracoin.
Coin Selection dialog showing addresses holding PrivateSend mixed balances in different denominations
Sending payments with PrivateSend
You can only use PrivateSend for payments once you have mixed enough Terracoin to make up the amount you are trying to send. Because the mixing process takes time, it must be done in advance before you create the send transaction. A PrivateSend transaction is effectively the same as any other transaction on the blockchain, but it draws only from input addresses where the denomination has previously been mixed to ensure anonymity of funds. Because several input addresses are usually required to make up the amount you are trying to send, a PrivateSend transaction will usually take up more space (in kilobytes) on the blockchain, and therefore will be charged a slightly higher fee. To send a payment using PrivateSend, go to the Send tab of the Terracoin Core wallet and enable the PrivateSend option. The balance displayed will change to show your PrivateSend balance instead of the total balance. You can then enter the Pay To address, Label, Amount and click Send as usual. Your payment will be rounded up to completely spend the lowest possible denomination of mixed balance available (currently to the nearest 0.01 TRC). You will be prompted to enter your password and receive a detailed breakdown of the fee structure for PrivateSend before sending.
Terracoin Core ready to send a PrivateSend transaction. Note PrivateSend is enabled and the amount to be sent is less than the available PrivateSend balance
How to safely back up your wallet
Introduction
This documentation describes how to safely back up your wallet file for safe storage in case your computer or laptop is damaged or lost. Terracoin Core stores all data necessary to control your Terracoin addresses in a single file called wallet.dat. This wallet is in the Berkeley DB format and stores the pairs of private/public cryptographic keys used to manage your balances on the Terracoin blockchain. Terracoin Core makes most of these operations transparent and even generates automatic backups of your wallet file in case it is corrupted, but the user is responsible for ensuring that these backups are stored in a safe place. If you lose access to these key pairs, you will permanently lose access to your Terracoin.
It is important to consider that if you have not encrypted your wallet using the Settings > Encrypt Wallet menu item, anyone with access to the backed up wallet.dat file will immediately have full access to your Terracoin. If you do choose to encrypt your wallet, do not store the password in the same place as the wallet.dat file, particularly if you are saving the backup to the cloud.
Backing up your wallet
Backing up from Terracoin Core
Firstly, never copy your wallet.dat file while Terracoin Core is open. Always use the File > Backup Wallet menu if the wallet is open. When you select this menu item, a dialog box will appear to specify where the file should be saved. Enter a name for the file, select a location and click Save. The example below shows saving the file to a USB stick. Keep this file in a physically separate location to your computer.
Backing up the Terracoin Core wallet from the File menu
Backing up by copying the wallet.dat file
If Terracoin Core is not running, you can also backup your wallet by simply copying the wallet.dat file to another location. This file is located in the TerracoinCore data folder. You were given the option to specify the location of this folder during installation, but by default the folder is in the following locations on different operating systems:
- Windows
C:\Users\YourUserName\Appdata\Roaming\TerracoinCore You can access this folder directly by Windows Key + R and typing %APPDATA%\TerracoinCore
- Linux
/home/YourUserName/.terracoincore You can access this folder directly by typing cd ~/.terracoincore at the terminal or ~/.terracoincore in the path bar using the Go > Enter Location... menu item in Files
- macOS
/Users/YourUserName/Library/Application Support/TerracoinCore You can access this folder by typing cd ~/Library/Application Support/TerracoinCore at the terminal or ~/Library/Application Support/TerracoinCore in dialog at the Go > Go To Folder menu item in Finder Ensure Terracoin Core is not running, then simply copy the wallet.dat file from this folder to another folder in the normal way for your operating system. The example below shows copying the file to a USB stick using simple drag and drop while holding down Ctrl on a Windows system. On most operating systems, you can also right click on the file and select Copy, then select Paste in the target folder. Keep this file in a physically separate location to your computer. Be careful to copy (not move) the file!
Automatic backups
Every time you open Terracoin Core, it will automatically create a backup copy of wallet.dat in the terracoincore/backups folder. Up to 10 backups can be kept here by default, and the oldest backup will be deleted as each additional new backup is created. You can modify the number of backups kept here using the -createwalletbackups=n parameter at the command line or in terracoin.conf. Setting this value to 0 completely disables backups.
You can view the automatic backups folder by browsing to TerracoinCore folder at the location specified above for wallet.dat and opening the backups folder, or by selecting Tools > Show Automatic Backups from the menu in Terracoin Core. Since these files are not active when Terracoin Core is running, you can safely copy them at any time. They are also a handy backup if the original files in the TerracoinCore folder become corrupted due to improper shutdown of the Terracoin Core app.
Restoring backups
To restore a backup, install Terracoin Core on the target system (or stop it, if already installed) and rename the existing wallet.dat file in the TerracoinCore folder.
Then copy the backup wallet file to the TerracoinCore folder and ensure it is named wallet.dat. Now, when you start Terracoin Core again, it will load the new wallet. Do not replace wallet.dat while Terracoin Core is running, since this will result in data corruption!
Backup storage considerations
Any backup depends to some extent on the existence of software capable of reading the data at some future point in time. As such, it is good practice to store a copy of the software used to create the backup together with the backup file itself. In this case, this would be a copy of the version of Terracoin Core you used to create the backup.
The wallet.dat file itself should be encrypted using a password set from the Settings > Encrypt Wallet menu item. However, this only prevents someone with access to the file from creating transactions, not from opening the file. You could additionally store the file in another encrypted container, such as a USB stick using BitLocker in Windows, LUKS in Linux or FileVault on macOS. It is also possible to create disk images or zip files with password encryption - the choice is yours. For further reading on encrypted containers, see here.
Where you store this file is then up to you. It could be in your home, in a safe deposit box at a bank, a waterproof container, or on cloud storage such as Google Drive or iCloud. Consider where you will store any passwords needed to restore access to the wallet (in your head, on paper, in a password manager, etc.) and who may need access to the password in the future.
Finally it is important to understand that wallet.dat itself is a relatively dangerous way to store large amounts of funds - it is simply a database file storing private keys. While the convenience of storing a wallet file directly is fine for smaller holdings, it is more secure to to store large amounts of Terracoin on a single predefined address in a way that you are guaranteed access through any software supporting the protocol, rather than a specific implementation of that protocol. If you are interested in this, read more about paper wallets, where the private key can be printed directly or also encrypted using BIP38 for safe storage.
Verifying backups
There is no fixed procedure to verify your backup, but you should test restoring it at least once to make sure it works. If you have a simple copy of the file, try to restore it to your current TerracoinCore folder and start Terracoin Core to make sure it opens without any errors. If you decided to store the file in an encrypted zip file, make sure you can unzip it and that it opens correctly in Terracoin Core. In short, make sure that you (or the person you are trusting to eventually go through this process for you) can actually reverse your backup process to get access to your Terracoin, instead of relying on the fact that this process should theoretically be reversible.
Guides for advanced functions
Below are the advanced functions.
Enable the Masternodes tab
You need to enable the wallet's Masternodes tab from the Options menu.
- From the wallet, select (Mac OSX) Terracoin Core => Preferences or (Windows) Settings => Optons...
- Click the Wallet tab.
- Check Enable coin control features and Show Masternodes Tab.
- Click OK
- Restart your wallet.
If your masternode.conf file has masternode entries, the Masternodes tab will now display.
Command line arguments
These commands are accurate as of Terracoin Core version 0.12.1.8.
terracoind
terracoin-qt
terracoin-cli
terracoin-tx
terracoind
TerracoinCore Daemon
Usage:
terracoind [options] Start terracoin Core Daemon
Options:
 -?                                    This help message
 -version                              Print version and exit
 -alerts                               Receive and display P2P network alerts (default: 1)
 -alertnotify=<cmd>                    Execute command when a relevant alert is received or we see a really long fork (%s in cmd is replaced by message)
 -blocknotify=<cmd>                    Execute command when the best block changes (%s in cmd is replaced by block hash)
 -assumevalid=<hex>                    If this block is in the chain assume that it and its ancestors are valid and potentially skip their script verification (0 to verify all, default: 00000000000000b4181bbbdddbae464ce11fede5d0292fb63fdede1e7c8ab21c, testnet: 00000ce22113f3eb8636e225d6a1691e132fdd587aed993e1bc9b07a0235eea4)
 -conf=<file>                          Specify configuration file (default: terracoin.conf)
 -daemon                               Run in the background as a daemon and accept commands
 -datadir=<dir>                        Specify data directory
 -dbcache=<n>                          Set database cache size in megabytes (4 to 16384, default: 100)
 -loadblock=<file>                     Imports blocks from external blk000??.dat file on startup
 -maxorphantx=<n>                      Keep at most <n> unconnectable transactions in memory (default: 100)
 -maxmempool=<n>                       Keep the transaction memory pool below <n> megabytes (default: 300)
 -mempoolexpiry=<n>                    Do not keep transactions in the mempool longer than <n> hours (default: 72)
 -par=<n>                              Set the number of script verification threads (-1 to 16, 0 = auto, <0 = leave that many cores free, default: 0)
 -pid=<file>                           Specify pid file (default: terracoind.pid)
 -prune=<n>                            Reduce storage requirements by pruning (deleting) old blocks. This mode is incompatible with -txindex and -rescan. Warning: Reverting this setting requires re-downloading the entire blockchain. (default: 0 = disable pruning blocks, >945 = target size in MiB to use for block files)
 -reindex-chainstate                   Rebuild chain state from the currently indexed blocks
 -reindex                              Rebuild chain state and block index from the blk*.dat files on disk
 -sysperms                             Create new files with system default permissions, instead of umask 077 (only effective with disabled wallet functionality)
 -txindex                              Maintain a full transaction index, used by the getrawtransaction rpc call (default: 1)
 -addressindex                         Maintain a full address index, used to query for the balance, txids and unspent outputs for addresses (default: 0)
 -timestampindex                       Maintain a timestamp index for block hashes, used to query blocks hashes by a range of timestamps (default: 0)
 -spentindex                           Maintain a full spent index, used to query the spending txid and input index for an outpoint (default: 0)
Connection options:
 -addnode=<ip>                         Add a node to connect to and attempt to keep the connection open
 -banscore=<n>                         Threshold for disconnecting misbehaving peers (default: 100)
 -bantime=<n>                          Number of seconds to keep misbehaving peers from reconnecting (default: 86400)
 -bind=<addr>                          Bind to given address and always listen on it. Use [host]:port notation for IPv6
 -connect=<ip>                         Connect only to the specified node(s)
 -discover                             Discover own IP addresses (default: 1 when listening and no -externalip or -proxy)
 -dns                                  Allow DNS lookups for -addnode, -seednode and -connect (default: 1)
 -dnsseed                              Query for peer addresses via DNS lookup, if low on addresses (default: 1 unless -connect)
 -externalip=<ip>                      Specify your own public address
 -forcednsseed                         Always query for peer addresses via DNS lookup (default: 0)
 -listen                               Accept connections from outside (default: 1 if no -proxy or -connect)
 -listenonion                          Automatically create Tor hidden service (default: 1)
 -maxconnections=<n>                   Maintain at most <n> connections to peers (temporary service connections excluded) (default: 125)
 -maxreceivebuffer=<n>                 Maximum per-connection receive buffer, <n>*1000 bytes (default: 5000)
 -maxsendbuffer=<n>                    Maximum per-connection send buffer, <n>*1000 bytes (default: 1000)
 -onion=<ip:port>                      Use separate SOCKS5 proxy to reach peers via Tor hidden services (default: -proxy)
 -onlynet=<net>                        Only connect to nodes in network <net> (ipv4, ipv6 or onion)
 -permitbaremultisig                   Relay non-P2SH multisig (default: 1)
 -peerbloomfilters                     Support filtering of blocks and transaction with bloom filters (default: 1)
 -port=<port>                          Listen for connections on <port> (default: 9999 or testnet: 19999)
 -proxy=<ip:port>                      Connect through SOCKS5 proxy
 -proxyrandomize                       Randomize credentials for every proxy connection. This enables Tor stream isolation (default: 1)
 -seednode=<ip>                        Connect to a node to retrieve peer addresses, and disconnect
 -timeout=<n>                          Specify connection timeout in milliseconds (minimum: 1, default: 5000)
 -torcontrol=<ip>:<port>               Tor control port to use if onion listening enabled (default: 127.0.0.1:9051)
 -torpassword=<pass>                   Tor control port password (default: empty)
 -upnp                                 Use UPnP to map the listening port (default: 0)
 -whitebind=<addr>                     Bind to given address and whitelist peers connecting to it. Use [host]:port notation for IPv6
 -whitelist=<netmask>                  Whitelist peers connecting from the given netmask or IP address. Can be specified multiple times. Whitelisted peers cannot be DoS banned and their transactions are always relayed, even if they are already in the mempool, useful e.g. for a gateway
 -whitelistrelay                       Accept relayed transactions received from whitelisted peers even when not relaying transactions (default: 1)
 -whitelistforcerelay                  Force relay of transactions from whitelisted peers even they violate local relay policy (default: 1)
 -maxuploadtarget=<n>                  Tries to keep outbound traffic under the given target (in MiB per 24h), 0 = no limit (default: 0)
Wallet options:
 -disablewallet                        Do not load the wallet and disable wallet RPC calls
 -keypool=<n>                          Set key pool size to <n> (default: 1000)
 -fallbackfee=<amt>                    A fee rate (in TRC/kB) that will be used when fee estimation has insufficient data (default: 0.0002)
 -mintxfee=<amt>                       Fees (in TRC/kB) smaller than this are considered zero fee for transaction creation (default: 0.0001)
 -paytxfee=<amt>                       Fee (in TRC/kB) to add to transactions you send (default: 0.00)
 -rescan                               Rescan the block chain for missing wallet transactions on startup
 -salvagewallet                        Attempt to recover private keys from a corrupt wallet.dat on startup
 -sendfreetransactions                 Send transactions as zero-fee transactions if possible (default: 0)
 -spendzeroconfchange                  Spend unconfirmed change when sending transactions (default: 1)
 -txconfirmtarget=<n>                  If paytxfee is not set, include enough fee so transactions begin confirmation on average within n blocks (default: 2)
 -maxtxfee=<amt>                       Maximum total fees (in TRC) to use in a single wallet transaction; setting this too low may abort large transactions (default: 0.20)
 -usehd                                Use hierarchical deterministic key generation (HD) after bip39/bip44. Only has effect during wallet creation/first start (default: 0)
 -mnemonic                             User defined mnemonic for HD wallet (bip39). Only has effect during wallet creation/first start (default: randomly generated)
 -mnemonicpassphrase                   User defined mnemonic passphrase for HD wallet (bip39). Only has effect during wallet creation/first start (default: empty string)
 -hdseed                               User defined seed for HD wallet (should be in hex). Only has effect during wallet creation/first start (default: randomly generated)
 -upgradewallet                        Upgrade wallet to latest format on startup
 -wallet=<file>                        Specify wallet file (within data directory) (default: wallet.dat)
 -walletbroadcast                      Make the wallet broadcast transactions (default: 1)
 -walletnotify=<cmd>                   Execute command when a wallet transaction changes (%s in cmd is replaced by TxID)
 -zapwallettxes=<mode>                 Delete all wallet transactions and only recover those parts of the blockchain through -rescan on startup (1 = keep tx meta data e.g. account owner and payment request information, 2 = drop tx meta data)
 -createwalletbackups=<n>              Number of automatic wallet backups (default: 10)
 -walletbackupsdir=<dir>               Specify full path to directory for automatic wallet backups (must exist)
 -keepass                              Use KeePass 2 integration using KeePassHttp plugin (default: 0)
 -keepassport=<port>                   Connect to KeePassHttp on port <port> (default: 19455)
 -keepasskey=<key>                     KeePassHttp key for AES encrypted communication with KeePass
 -keepassid=<name>                     KeePassHttp id for the established association
 -keepassname=<name>                   Name to construct url for KeePass entry that stores the wallet passphrase
ZeroMQ notification options:
 -zmqpubhashblock=<address>            Enable publish hash block in <address>
 -zmqpubhashtx=<address>               Enable publish hash transaction in <address>
 -zmqpubhashtxlock=<address>           Enable publish hash transaction (locked via InstantSend) in <address>
 -zmqpubrawblock=<address>             Enable publish raw block in <address>
 -zmqpubrawtx=<address>                Enable publish raw transaction in <address>
 -zmqpubrawtxlock=<address>            Enable publish raw transaction (locked via InstantSend) in <address>
Debugging/Testing options:
 -uacomment=<cmt>                      Append comment to the user agent string
 -debug=<category>                     Output debugging information (default: 0, supplying <category> is optional). If <category> is not supplied or if <category> = 1, output all debugging information.<category> can be: addrman, alert, bench, coindb, db, http, libevent, lock, mempool, mempoolrej, net, proxy, prune, rand, reindex, rpc, selectcoins, tor, zmq, terracoin (or specifically: gobject, instantsend, keepass, masternode, mnpayments, mnsync, privatesend, spork).
 -gen                                  Generate coins (default: 0)
 -genproclimit=<n>                     Set the number of threads for coin generation if enabled (-1 = all cores, default: 1)
 -help-debug                           Show all debugging options (usage: --help -help-debug)
 -logips                               Include IP addresses in debug output (default: 0)
 -logtimestamps                        Prepend debug output with timestamp (default: 1)
 -minrelaytxfee=<amt>                  Fees (in TRC/kB) smaller than this are considered zero fee for relaying, mining and transaction creation (default: 0.0001)
 -printtoconsole                       Send trace/debug info to console instead of debug.log file
 -printtodebuglog                      Send trace/debug info to debug.log file (default: 1)
 -shrinkdebugfile                      Shrink debug.log file on client startup (default: 1 when no -debug)
Chain selection options:
 -testnet                              Use the test chain
 -litemode=<n>                         Disable all Terracoin specific functionality (Masternodes, PrivateSend, InstantSend, Governance) (0-1, default: 0)
Masternode options:
 -masternode=<n>                       Enable the client to act as a masternode (0-1, default: 0)
 -mnconf=<file>                        Specify masternode configuration file (default: masternode.conf)
 -mnconflock=<n>                       Lock masternodes from masternode configuration file (default: 1)
 -masternodeprivkey=<n>                Set the masternode private key
PrivateSend options:
 -enableprivatesend=<n>                Enable use of automated PrivateSend for funds stored in this wallet (0-1, default: 0)
 -privatesendmultisession=<n>          Enable multiple PrivateSend mixing sessions per block, experimental (0-1, default: 0)
 -privatesendrounds=<n>                Use N separate masternodes for each denominated input to mix funds (2-16, default: 2)
 -privatesendamount=<n>                Keep N TRC anonymized (default: 1000)
 -liquidityprovider=<n>                Provide liquidity to PrivateSend by infrequently mixing coins on a continual basis (0-100, default: 0, 1=very frequent, high fees, 100=very infrequent, low fees)
InstantSend options:
 -enableinstantsend=<n>                Enable InstantSend, show confirmations for locked transactions (0-1, default: 1)
 -instantsenddepth=<n>                 Show N confirmations for a successfully locked transaction (0-9999, default: 5)
 -instantsendnotify=<cmd>              Execute command when a wallet InstantSend transaction is successfully locked (%s in cmd is replaced by TxID)
Node relay options:
 -bytespersigop                        Minimum bytes per sigop in transactions we relay and mine (default: 20)
 -datacarrier                          Relay and mine data carrier transactions (default: 1)
 -datacarriersize                      Maximum size of data in data carrier transactions we relay and mine (default: 83)
 -mempoolreplacement                   Enable transaction replacement in the memory pool (default: 0)
Block creation options:
 -blockminsize=<n>                     Set minimum block size in bytes (default: 0)
 -blockmaxsize=<n>                     Set maximum block size in bytes (default: 750000)
 -blockprioritysize=<n>                Set maximum size of high-priority/low-fee transactions in bytes (default: 10000)
RPC server options:
 -server                               Accept command line and JSON-RPC commands
 -rest                                 Accept public REST requests (default: 0)
 -rpcbind=<addr>                       Bind to given address to listen for JSON-RPC connections. Use [host]:port notation for IPv6. This option can be specified multiple times (default: bind to all interfaces)
 -rpccookiefile=<loc>                  Location of the auth cookie (default: data dir)
 -rpcuser=<user>                       Username for JSON-RPC connections
 -rpcpassword=<pw>                     Password for JSON-RPC connections
 -rpcauth=<userpw>                     Username and hashed password for JSON-RPC connections. The field <userpw> comes in the format: <USERNAME>:<SALT>$<HASH>. A canonical python script is included in share/rpcuser. This option can be specified multiple times
 -rpcport=<port>                       Listen for JSON-RPC connections on <port> (default: 9998 or testnet: 19998)
 -rpcallowip=<ip>                      Allow JSON-RPC connections from specified source. Valid for <ip> are a single IP (e.g. 1.2.3.4), a network/netmask (e.g. 1.2.3.4/255.255.255.0) or a network/CIDR (e.g. 1.2.3.4/24). This option can be specified multiple times
 -rpcthreads=<n>                       Set the number of threads to service RPC calls (default: 4)
terracoin-qt
Terracoin Core QT GUI, use same command line options as terracoind with additional options for UI as described below.
Terracoin Core
Usage:
terracoin-qt [command-line options]
Wallet options:
-windowtitle=<name> Wallet window title
Debugging/Testing options:
-debug=<category> Output debugging information (default: 0, supplying <category> is optional). If <category> is not supplied or if <category> = 1, output all debugging information.<category> can be: addrman, alert, bench, coindb, db, http, libevent, lock, mempool, mempoolrej, net, proxy, prune, rand, reindex, rpc, selectcoins, tor, zmq, terracoin (or specifically: gobject, instantsend, keepass, masternode, mnpayments, mnsync, privatesend, spork), qt.
UI options:
 -choosedatadir                        Choose data directory on startup (default: 0)
 -lang=<lang>                          Set language, for example "de_DE" (default: system locale)
 -min                                  Start minimized
 -rootcertificates=<file>              Set SSL root certificates for payment request (default: -system-)
 -splash                               Show splash screen on startup (default: 1)
 -resetguisettings                     Reset all settings changed in the GUI
terracoin-cli
Terracoin Core RPC client
Usage:
terracoin-cli [options] <command> [params]  Send command to Terracoin Core
terracoin-cli [options] help                List commands
terracoin-cli [options] help <command>      Get help for a command
Options:
 -?                                    This help message
 -conf=<file>                          Specify configuration file (default: terracoin.conf)
 -datadir=<dir>                        Specify data directory
Chain selection options:
 -testnet                              Use the test chain
 -regtest                              Enter regression test mode, which uses a special chain in which blocks can be solved instantly. This is intended for regression testing tools and app development.
 -rpcconnect=<ip>                      Send commands to node running on <ip> (default: 127.0.0.1)
 -rpcport=<port>                       Connect to JSON-RPC on <port> (default: 9998 or testnet: 19998)
 -rpcwait                              Wait for RPC server to start
 -rpcuser=<user>                       Username for JSON-RPC connections
 -rpcpassword=<pw>                     Password for JSON-RPC connections
 -rpcclienttimeout=<n>                 Timeout during HTTP requests (default: 900)
terracoin-tx
Terracoin Core terracoin-tx utility
Usage:
 terracoin-tx [options] <hex-tx> [commands] Update hex-encoded terracoin transaction
 terracoin-tx [options] -create [commands]  Create hex-encoded terracoin transaction
Options:
 -?                                    This help message
 -create                               Create new, empty TX.
 -json                                 Select JSON output
 -txid                                 Output only the hex-encoded transaction id of the resultant transaction.
Chain selection options:
 -testnet                              Use the test chain
 -regtest                              Enter regression test mode, which uses a special chain in which blocks can be solved instantly. This is intended for regression testing tools and app development.
Commands:
 delin=N                               Delete input N from TX
 delout=N                              Delete output N from TX
 in=TXID:VOUT                          Add input to TX
 locktime=N                            Set TX lock time to N
 nversion=N                            Set TX version to N
 outaddr=VALUE:ADDRESS                 Add address-based output to TX
 outdata=[VALUE:]DATA                  Add data-based output to TX
 outscript=VALUE:SCRIPT                Add raw script output to TX
 sign=SIGHASH-FLAGS                    Add zero or more signatures to transaction. This command requires JSON registers:prevtxs=JSON object, privatekeys=JSON object. See signrawtransaction docs for format of sighash flags, JSON objects.
Register Commands:
 load=NAME:FILENAME                    Load JSON file FILENAME into register NAME
 set=NAME:JSON-STRING                  Set register NAME to given JSON-STRING
RPC commands
This documentation lists all available RPC commands as of Terracoin version 0.12.2.1, and limited documentation on what each command does. For full documentation of arguments, results and examples, type help ( "command" ) to view full details at the console. You can enter commands either from Tools > Debug console in the QT wallet, or using terracoin-cli for headless wallets and terracoind.
Addressindex
 getaddressbalance                          Returns the balance for an address(es) (requires addressindex to be enabled).
 getaddressdeltas                           Returns all changes for an address (requires addressindex to be enabled).
 getaddressmempool                          Returns all mempool deltas for an address (requires addressindex to be enabled).
 getaddresstxids                            Returns the txids for an address(es) (requires addressindex to be enabled).
 getaddressutxos                            Returns all unspent outputs for an address (requires addressindex to be enabled).
Blockchain
 getbestblockhash                           Returns the hash of the best (tip) block in the longest block chain.
 getblock "hash" ( verbose )                If verbose is false, returns a string that is serialized, hex-encoded data for block 'hash'. If verbose is true, returns an Object with information about block <hash>.
 getblockchaininfo                          Returns an object containing various state info regarding block chain processing.
 getblockcount                              Returns the number of blocks in the longest block chain.
 getblockhash index                         Returns hash of block in best-block-chain at index provided.
 getblockhashes timestamp                   Returns array of hashes of blocks within the timestamp range provided.
 getblockheader "hash" ( verbose )          If verbose is false, returns a string that is serialized, hex-encoded data for blockheader 'hash'. If verbose is true, returns an Object with information about blockheader <hash>.
 getblockheaders "hash" ( count verbose )   Returns an array of items with information about <count> blockheaders starting from <hash>. If verbose is false, each item is a string that is serialized, hex-encoded data for a single blockheader. If verbose is true, each item is an Object with information about a single blockheader.
 getchaintips ( count branchlen )           Return information about all known tips in the block tree, including the main chain as well as orphaned branches.
 getdifficulty                              Returns the proof-of-work difficulty as a multiple of the minimum difficulty.
 getmempoolinfo                             Returns details on the active state of the TX memory pool.
 getrawmempool ( verbose )                  Returns all transaction ids in memory pool as a json array of string transaction ids.
 getspentinfo                               Returns the txid and index where an output is spent.
 gettxout "txid" n ( includemempool )       Returns details about an unspent transaction output.
 gettxoutproof ["txid",...] ( blockhash )   Returns a hex-encoded proof that "txid" was included in a block.
 gettxoutsetinfo                            Returns statistics about the unspent transaction output set. Note this call may take some time.
 verifychain ( checklevel numblocks )       Verifies blockchain database.
 verifytxoutproof "proof"                   Verifies that a proof points to a transaction in a block, returning the transaction it commits to nd throwing an RPC error if the block is not in our best chain.
Control
 debug ( 0|1|addrman|alert|bench|coindb|db|lock|rand|rpc|selectcoins|mempool|mempoolrej|net|proxy|prune|http|libevent|tor|zmq|terracoin|privatesend|instantsend|masternode|spork|keepass|mnpayments|gobject )
                                          Change debug category on the fly. Specify single category or use comma to specify many.
 getinfo                                    Returns an object containing various state info.
 help ( "command" )                         List all commands, or get help for a specified command.
 stop                                       Stop Terracoin Core server.
Terracoin
getgovernanceinfo Returns an object containing governance parameters.
getpoolinfo Returns an object containing mixing pool related information.
getsuperblockbudget index Returns the absolute maximum sum of superblock payments allowed.
gobject "command"... Manage governance objects. Available commands:
check - Validate governance object data (proposal only)
prepare - Prepare governance object by signing and creating tx
submit - Submit governance object to network
deserialize - Deserialize governance object from hex string to JSON
count - Count governance objects and votes
get - Get governance object by hash
getvotes - Get all votes for a governance object hash (including old votes)
getcurrentvotes - Get only current (tallying) votes for a governance object hash (does not include old votes)
list - List governance objects (can be filtered by signal and/or object type)
diff - List differences since last diff
vote-alias - Vote on a governance object by masternode alias (using masternode.conf setup)
vote-conf - Vote on a governance object by masternode configured in terracoin.conf
vote-many - Vote on a governance object by all masternodes (using masternode.conf setup)
masternode "command"... Set of commands to execute masternode related actions. Available commands:
count - Print number of all known masternodes (optional: 'ps', 'enabled', 'all', 'qualify')
current - Print info on current masternode winner to be paid the next block (calculated locally)
genkey - Generate new masternodeprivkey
outputs - Print masternode compatible outputs
start-alias - Start single remote masternode by assigned alias configured in masternode.conf
start-<mode> - Start remote masternodes configured in masternode.conf (<mode>: 'all', 'missing', 'disabled')
status - Print masternode status information
list - Print list of all known masternodes (see masternodelist for more info)
list-conf - Print masternode.conf in JSON format
winner - Print info on next masternode winner to vote for
winners - Print list of masternode winners
masternodebroadcast "command"... Set of commands to create and relay masternode broadcast messages. Available commands:
create-alias - Create single remote masternode broadcast message by assigned alias configured in masternode.conf
create-all - Create remote masternode broadcast messages for all masternodes configured in masternode.conf
decode - Decode masternode broadcast message
relay - Relay masternode broadcast message to the network
masternodelist ( "mode" "filter" ) Get a list of masternodes in different modes
mnsync [status|next|reset] Returns the sync status, updates to the next step or resets it entirely.
privatesend "command" Available commands:
start - Start mixing
stop - Stop mixing
reset - Reset mixing
sentinelping version Sentinel ping.
spork <name> [<value>] <name> is the corresponding spork name, or 'show' to show all current spork settings, active to show which sporks are active<value> is a epoch datetime to enable or disable spork. Requires wallet passphrase to be set with walletpassphrase call.
voteraw <masternode-tx-hash> <masternode-tx-index> <governance-hash> <vote-signal> [yes|no|abstain]
Generating
 generate numblocks                         Mine blocks immediately (before the RPC call returns).
 getgenerate                                Return if the server is set to generate coins or not. The default is false. It is set with the command line argument -gen (or terracoin.conf setting gen). It can also be set with the setgenerate call.
 setgenerate generate ( genproclimit )      Set 'generate' true or false to turn generation on or off. Generation is limited to 'genproclimit' processors, -1 is unlimited. See the getgenerate call for the current setting.
Mining
 getblocktemplate ( "jsonrequestobject" )   If the request parameters include a 'mode' key, that is used to explicitly select between the default 'template' request or a 'proposal'. It returns data needed to construct a block to work on.
 getmininginfo                              Returns a json object containing mining-related information.
 getnetworkhashps ( blocks height )         Returns the estimated network hashes per second based on the last n blocks. Pass in [blocks] to override # of blocks, -1 specifies since last difficulty change. Pass in [height] to estimate the network speed at the time when a certain block was found.
 prioritisetransaction <txid> <priority delta> <fee delta>
                                          Accepts the transaction into mined blocks at a higher (or lower) priority.
 submitblock "hexdata" ( "jsonparametersobject" )
                                          Attempts to submit new block to network. The 'jsonparametersobject' parameter is currently ignored. See https://en.bitcoin.it/wiki/BIP_0022 for full specification.
Network
 addnode "node" "add|remove|onetry"         Attempts add or remove a node from the addnode list. Or try a connection to a node once.
 clearbanned                                Clear all banned IPs.
 disconnectnode "node"                      Immediately disconnects from the specified node.
 getaddednodeinfo dummy ( "node" )          Returns information about the given added node, or all added nodes (note that onetry addnodes are not listed here).
 getconnectioncount                         Returns the number of connections to other nodes.
 getnettotals                               Returns information about network traffic, including bytes in, bytes out, and current time.
 getnetworkinfo                             Returns an object containing various state info regarding P2P networking.
 getpeerinfo                                Returns data about each connected network node as a json array of objects.
 listbanned                                 List all banned IPs/Subnets.
 ping                                       Requests that a ping be sent to all other nodes, to measure ping time. Results provided in getpeerinfo, pingtime and pingwait fields are decimal seconds. Ping command is handled in queue with all other commands, so it measures processing backlog, not just network ping.
 setban "ip(/netmask)" "add|remove" (bantime) (absolute)
                                          Attempts add or remove a IP/Subnet from the banned list.
 setnetworkactive true|false                Disable/enable all p2p network activity.
Rawtransactions
 createrawtransaction [{"txid":"id","vout":n},...] {"address":amount,"data":"hex",...} ( locktime )
                                          Create a transaction spending the given inputs and creating new outputs. Outputs can be addresses or data. Returns hex-encoded raw transaction. Note that the transaction's inputs are not signed, and it is not stored in the wallet or transmitted to the network.
 decoderawtransaction "hexstring"           Return a JSON object representing the serialized, hex-encoded transaction.
 decodescript "hex"                         Decode a hex-encoded script.
 fundrawtransaction "hexstring" includeWatching
                                          Add inputs to a transaction until it has enough in value to meet its out value. This will not modify existing inputs, and will add one change output to the outputs.
 getrawtransaction "txid" ( verbose )       Return the raw transaction data. If verbose=0, returns a string that is serialized, hex-encoded data for 'txid'. If verbose is non-zero, returns an Object with information about 'txid'.
 sendrawtransaction "hexstring" ( allowhighfees instantsend )
                                          Submits raw transaction (serialized, hex-encoded) to local node and network. Also see createrawtransaction and signrawtransaction calls.
 signrawtransaction "hexstring" ( [{"txid":"id","vout":n,"scriptPubKey":"hex","redeemScript":"hex"},...] ["privatekey1",...] sighashtype )
                                          Sign inputs for raw transaction (serialized, hex-encoded). The second optional argument (may be null) is an array of previous transaction outputs that this transaction depends on but may not yet be in the block chain. The third optional argument (may be null) is an array of base58-encoded private keys that, if given, will be the only keys used to sign the transaction.
Util
 createmultisig nrequired ["key",...]       Creates a multi-signature address with n signature of m keys required. It returns a json object with the address and redeemScript.
 estimatefee nblocks                        Estimates the approximate fee per kilobyte needed for a transaction to begin confirmation within nblocks blocks.
 estimatepriority nblocks                   Estimates the approximate priority a zero-fee transaction needs to begin confirmation within nblocks blocks.
 estimatesmartfee nblocks                   WARNING: This interface is unstable and may disappear or change! Estimates the approximate fee per kilobyte needed for a transaction to begin confirmation within nblocks blocks if possible and return the number of blocks for which the estimate is valid.
 estimatesmartpriority nblocks              WARNING: This interface is unstable and may disappear or change! Estimates the approximate priority a zero-fee transaction needs to begin confirmation within nblocks blocks if possible and return the number of blocks for which the estimate is valid.
 validateaddress "terracoinaddress"              Return information about the given terracoin address.
 verifymessage "terracoinaddress" "signature" "message"
                                          Verify a signed message.
Wallet
 abandontransaction "txid"                  Mark in-wallet transaction <txid> as abandoned. This will mark this transaction and all its in-wallet descendants as abandoned which will allow for their inputs to be respent.
 addmultisigaddress nrequired ["key",...] ( "account" )
                                          Add a nrequired-to-sign multisignature address to the wallet. Each key is a Terracoin address or hex-encoded public key. If 'account' is specified (DEPRECATED), assign address to that account.
 backupwallet "destination"                 Safely copies wallet.dat to destination, which can be a directory or a path with filename.
 dumphdinfo                                 Returns an object containing sensitive private info about this HD wallet.
 dumpprivkey "terracoinaddress"                  Reveals the private key corresponding to 'terracoinaddress'. Then the importprivkey can be used with this output
 dumpwallet "filename"                      Dumps all wallet keys in a human-readable format.
 encryptwallet "passphrase"                 Encrypts the wallet with 'passphrase'. This is for first time encryption. After this, any calls that interact with private keys such as sending or signing will require the passphrase to be set prior the making these calls. Use the walletpassphrase call for this, and then walletlock call. If the wallet is already encrypted, use the walletpassphrasechange call. Note that this will shutdown the server.
 getaccount "terracoinaddress"                   DEPRECATED. Returns the account associated with the given address.
 getaccountaddress "account"                DEPRECATED. Returns the current Terracoin address for receiving payments to this account.
 getaddressesbyaccount "account"            DEPRECATED. Returns the list of addresses for the given account.
 getbalance ( "account" minconf addlockconf includeWatchonly )
                                          If account is not specified, returns the server's total available balance. If account is specified (DEPRECATED), returns the balance in the account. Note that the account "" is not the same as leaving the parameter out. The server total may be different to the balance in the default "" account.
 getnewaddress ( "account" )                Returns a new Terracoin address for receiving payments. If 'account' is specified (DEPRECATED), it is added to the address book so payments received with the address will be credited to 'account'.
 getrawchangeaddress                        Returns a new Terracoin address, for receiving change. This is for use with raw transactions, NOT normal use.
 getreceivedbyaccount "account" ( minconf addlockconf )
                                          DEPRECATED. Returns the total amount received by addresses with <account> in transactions with specified minimum number of confirmations.
 getreceivedbyaddress "terracoinaddress" ( minconf addlockconf )
                                          Returns the total amount received by the given terracoinaddress in transactions with specified minimum number of confirmations.
 gettransaction "txid" ( includeWatchonly ) Get detailed information about in-wallet transaction <txid>
 getunconfirmedbalance                      Returns the server's total unconfirmed balance.
 getwalletinfo                              Returns an object containing various wallet state info.
 importaddress "address" ( "label" rescan p2sh )
                                          Adds a script (in hex) or address that can be watched as if it were in your wallet but cannot be used to spend.
 importelectrumwallet "filename" index      Imports keys from an Electrum wallet export file (.csv or .json)
 importprivkey "terracoinprivkey" ( "label" rescan )
                                          Adds a private key (as returned by dumpprivkey) to your wallet.
 importpubkey "pubkey" ( "label" rescan )   Adds a public key (in hex) that can be watched as if it were in your wallet but cannot be used to spend.
 importwallet "filename"                    Imports keys from a wallet dump file (see dumpwallet).
 instantsendtoaddress "terracoinaddress" amount ( "comment" "comment-to" subtractfeefromamount )
                                          Send an amount to a given address. The amount is a real and is rounded to the nearest 0.00000001
 keepass <genkey|init|setpassphrase>
 keypoolrefill ( newsize )                  Fills the keypool.
 listaccounts ( minconf addlockconf includeWatchonly)
                                          DEPRECATED. Returns Object that has account names as keys, account balances as values.
 listaddressgroupings                       Lists groups of addresses which have had their common ownership made public by common use as inputs or as the resulting change in past transactions.
 listlockunspent                            Returns list of temporarily unspendable outputs. See the lockunspent call to lock and unlock transactions for spending.
 listreceivedbyaccount ( minconf addlockconf includeempty includeWatchonly)
                                          DEPRECATED. List balances by account.
 listreceivedbyaddress ( minconf addlockconf includeempty includeWatchonly)
                                          List balances by receiving address.
 listsinceblock ( "blockhash" target-confirmations includeWatchonly)
                                          Get all transactions in blocks since block [blockhash], or all transactions if omitted
 listtransactions ( "account" count from includeWatchonly)
                                          Returns up to 'count' most recent transactions skipping the first 'from' transactions for account 'account'.
 listunspent ( minconf maxconf ["address",...] )
                                          Returns array of unspent transaction outputs with between minconf and maxconf (inclusive) confirmations. Optionally filter to only include txouts paid to specified addresses.
 lockunspent unlock [{"txid":"txid","vout":n},...]
                                          Updates list of temporarily unspendable outputs. Temporarily lock (unlock=false) or unlock (unlock=true) specified transaction outputs.
 move "fromaccount" "toaccount" amount ( minconf "comment" )
                                          DEPRECATED. Move a specified amount from one account in your wallet to another.
 sendfrom "fromaccount" "toterracoinaddress" amount ( minconf addlockconf "comment" "comment-to" )
                                          DEPRECATED (use sendtoaddress). Sent an amount from an account to a terracoin address.
 sendmany "fromaccount" {"address":amount,...} ( minconf addlockconf "comment" ["address",...] subtractfeefromamount use_is use_ps )
                                          Send multiple times. Amounts are double-precision floating point numbers.
 sendtoaddress "terracoinaddress" amount ( "comment" "comment-to" subtractfeefromamount use_is use_ps )
                                          Send an amount to a given address.
 setaccount "terracoinaddress" "account"         DEPRECATED. Sets the account associated with the given address.
 settxfee amount                            Set the transaction fee per kB. Overwrites the paytxfee parameter.
 signmessage "terracoinaddress" "message"        Sign a message with the private key of an address.
 walletlock                                 Removes the wallet encryption key from memory, locking the wallet. After calling this method, you will need to call walletpassphrase again before being able to call any methods which require the wallet to be unlocked.
 walletpassphrase "passphrase" timeout ( mixingonly )
                                          Stores the wallet decryption key in memory for 'timeout' seconds. This is needed prior to performing transactions related to private keys such as sending terracoins
 walletpassphrasechange "oldpassphrase" "newpassphrase"
                                          Changes the wallet passphrase from 'oldpassphrase' to 'newpassphrase'.
Running Terracoin
Terracoin.conf Configuration File
All command-line options (except for -datadir and -conf) may be specified in a configuration file, and all configuration file options may also be specified on the command line. Command-line options override values set in the configuration file.
Commands:
terracoind -help
terracoind_-help.txt
terracoin-cli -help
terracoin-cli_-help.txt
terracoin-tx -help
terracoin-tx_-help.txt
terracoin-qt -help
terracoin-qt_-help.txt
The configuration file is a list of setting=value pairs, one per line, with optional comments starting with the '#' character.
The configuration file is not automatically created; you can create it using your favorite plain-text editor. By default, Terracoin-Qt (or terracoind) will look for a file named 'terracoin.conf' in the terracoin data directory, but both the data directory and the configuration file path may be changed using the -datadir and -conf command-line arguments.
Windows
%APPDATA%\TerracoinCore\
(XP) C:\Documents and Settings\username\Application Data\TerracoinCore\terracoin.conf
(Vista, 7,8,8.1,10) C:\Users\username\AppData\Roaming\TerracoinCore\terracoin.conf
Linux
$HOME/.terracoincore/
/home/username/.terracoincore/terracoin.conf
Mac
OSX
$HOME/Library/Application Support/TerracoinCore/
/Users/username/Library/Application Support/TerracoinCore/terracoin.conf
Note: if running Terracoin in testnet mode, the sub-folder "testnet3" will be appended to the data directory automatically.

